Proxmox Cluster

Creating a Proxmox Cluster with High Availability for Seamless Virtualization
A Proxmox cluster with high availability enables efficient management of virtual machines and containers while ensuring maximum fault tolerance – ideal for anyone looking for a stable and flexible virtualization environment.
1. Basics
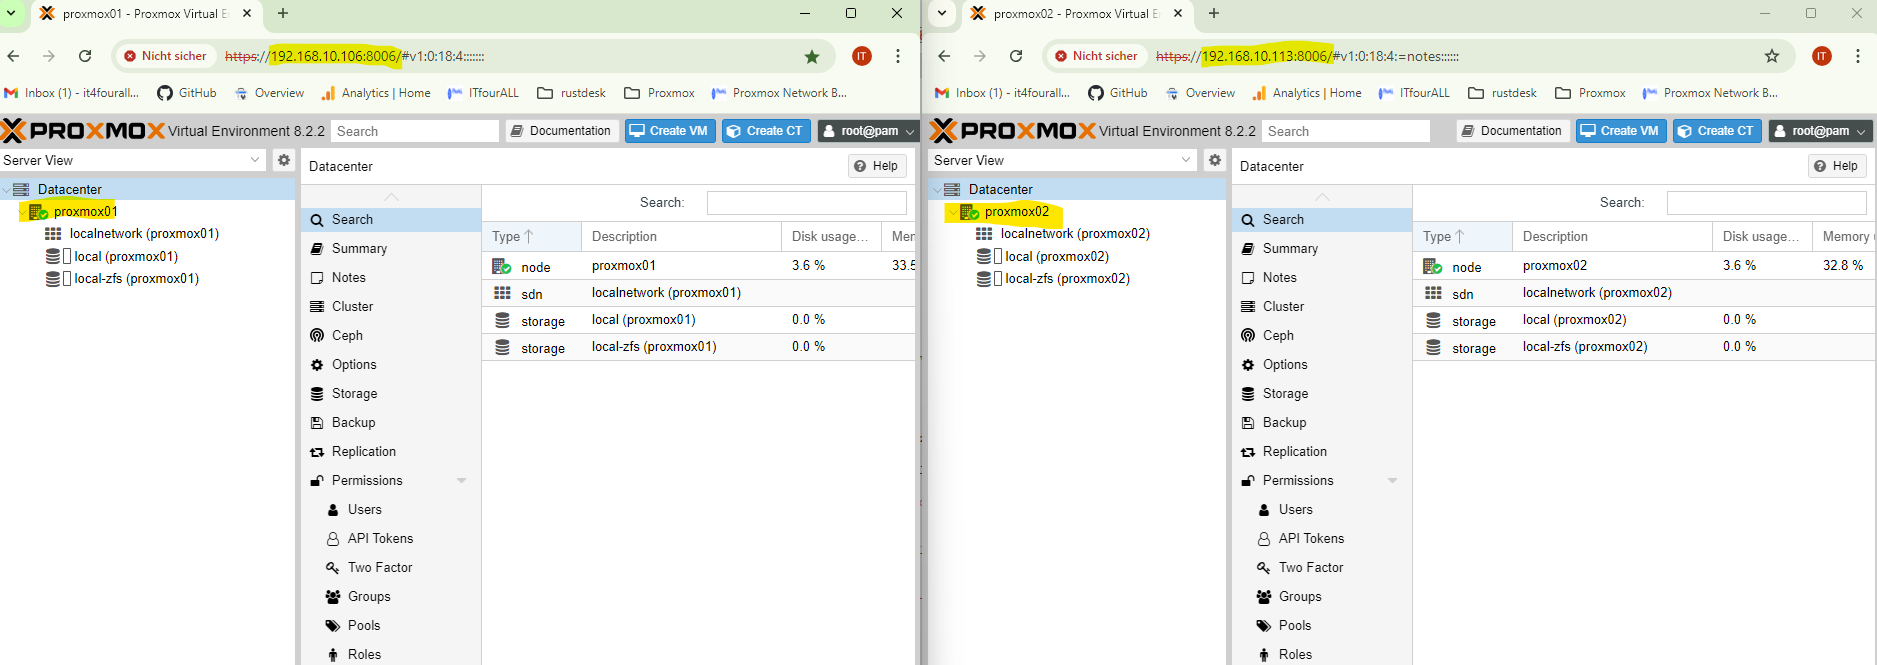
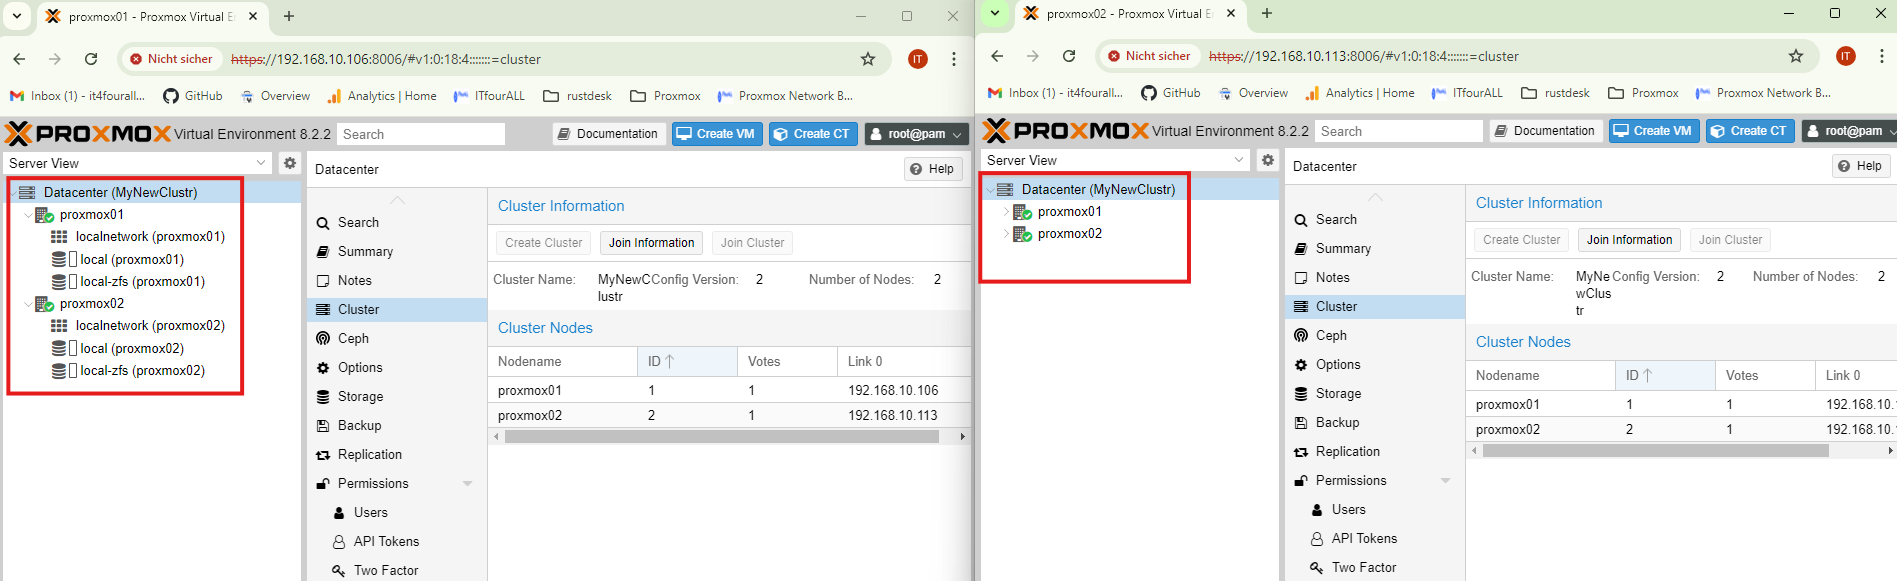
Overview: In this example, we have two nodes, Proxmox01 and Proxmox02, which are combined into a cluster and made highly available. This means that if one node fails, the other takes over. When both nodes are online, virtual machines can be seamlessly moved between them.
Both nodes are connected to the network and are in the same network. In this example, the management network card and the synchronization network card are the same. However, in a production environment, I recommend using a separate network card with a separate IP address. When the time comes, I will point out how to select the network card for synchronization.
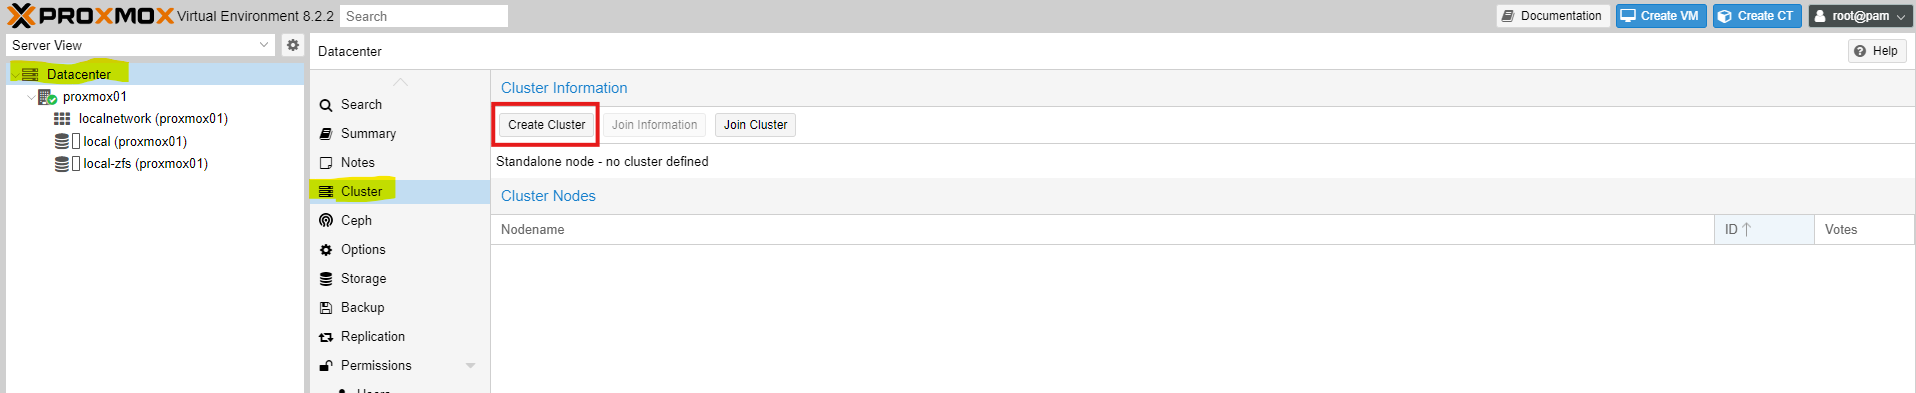
2. Create Cluster
Now we will create the cluster, which means we will select one node on which to set up the cluster, and then add the other node to it. You can also add multiple nodes to the cluster later. You are free to choose the node on which to create the cluster; in this case, I will create the cluster on Proxmox01, but you could also create it on Proxmox02—it's entirely up to you.
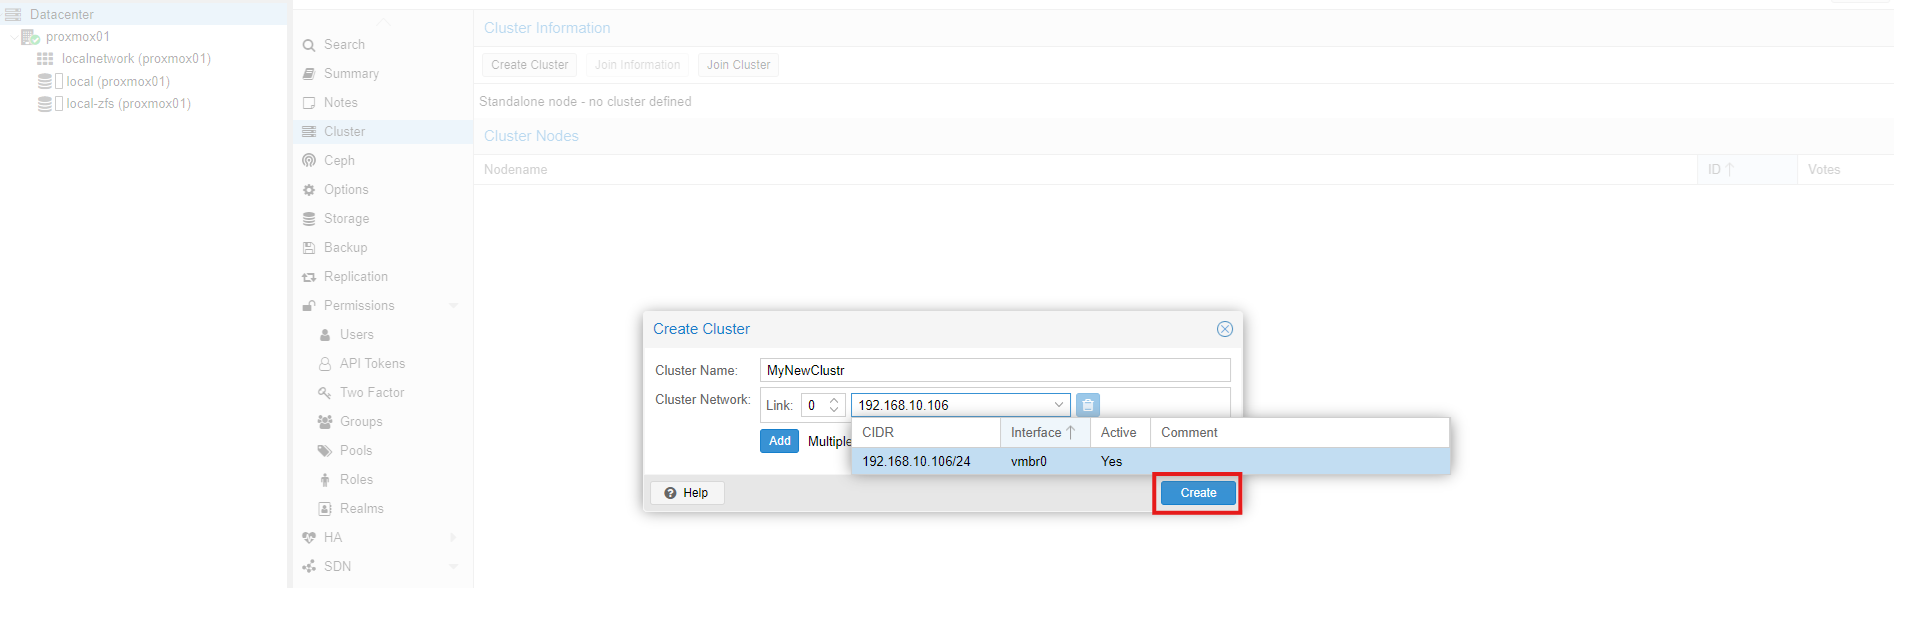
Now we have reached the point where we select the network card on which the nodes will establish their cluster connection. It is important to ensure that all nodes are in the same network.
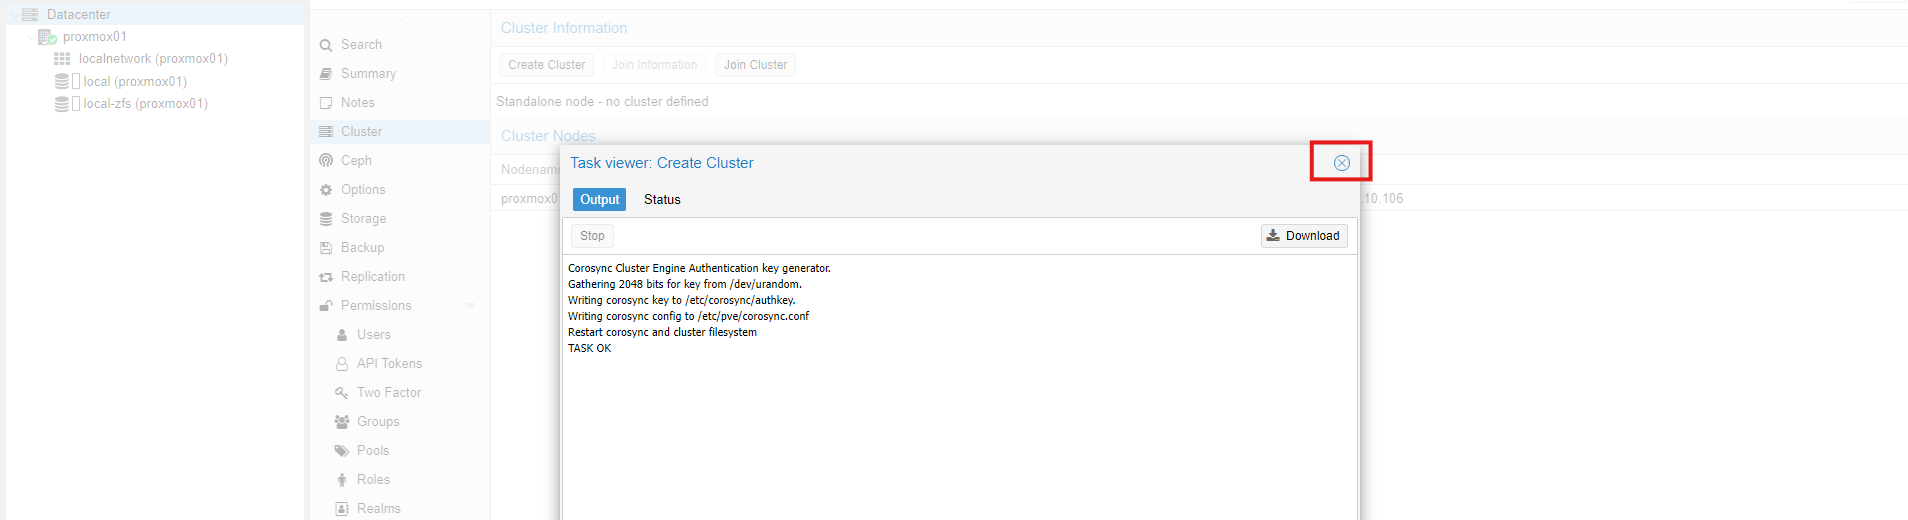
Then click Create.
Close the window if finish.
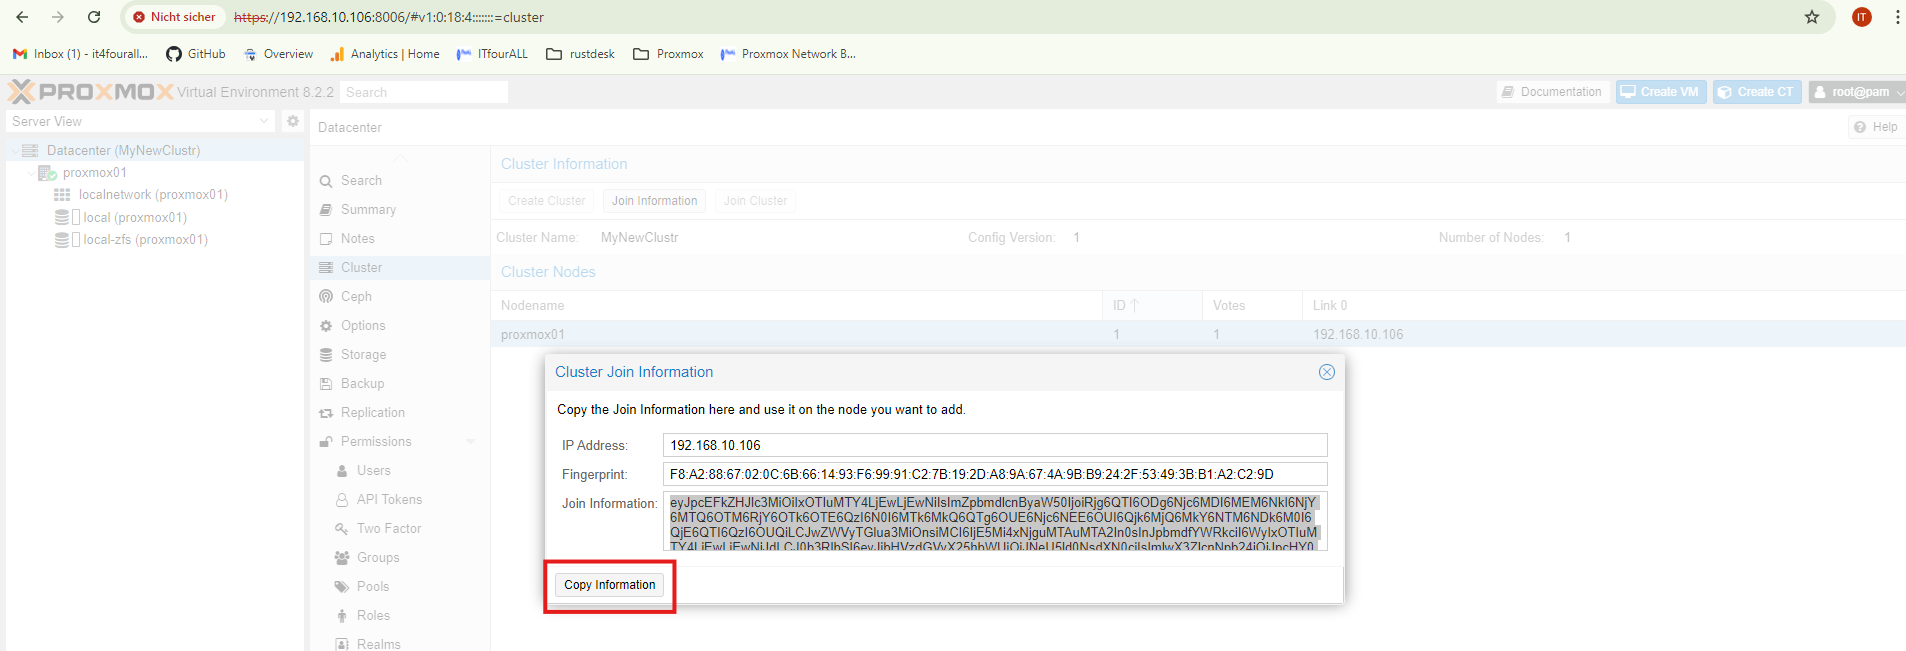
Click on 'Join Information'
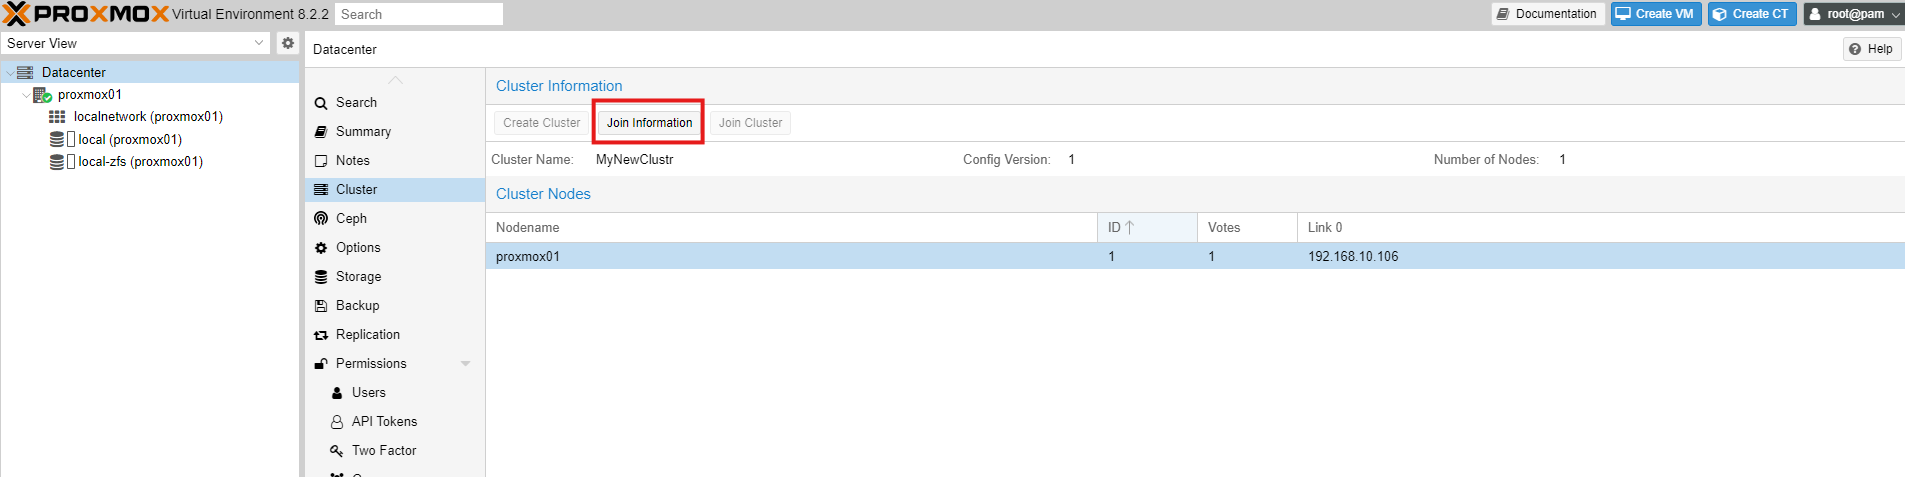
Copy the Information, we need it on Node Proxmox02
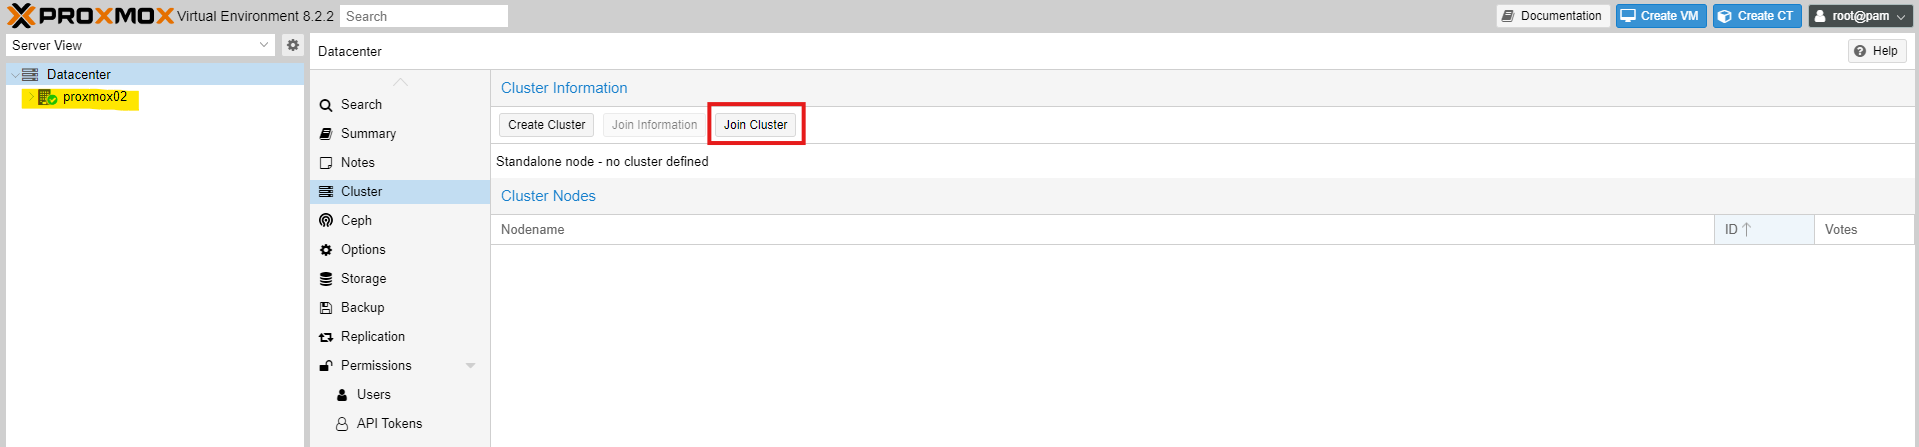
3. Join Cluster
Now we will switch to the other node and add it to the cluster.
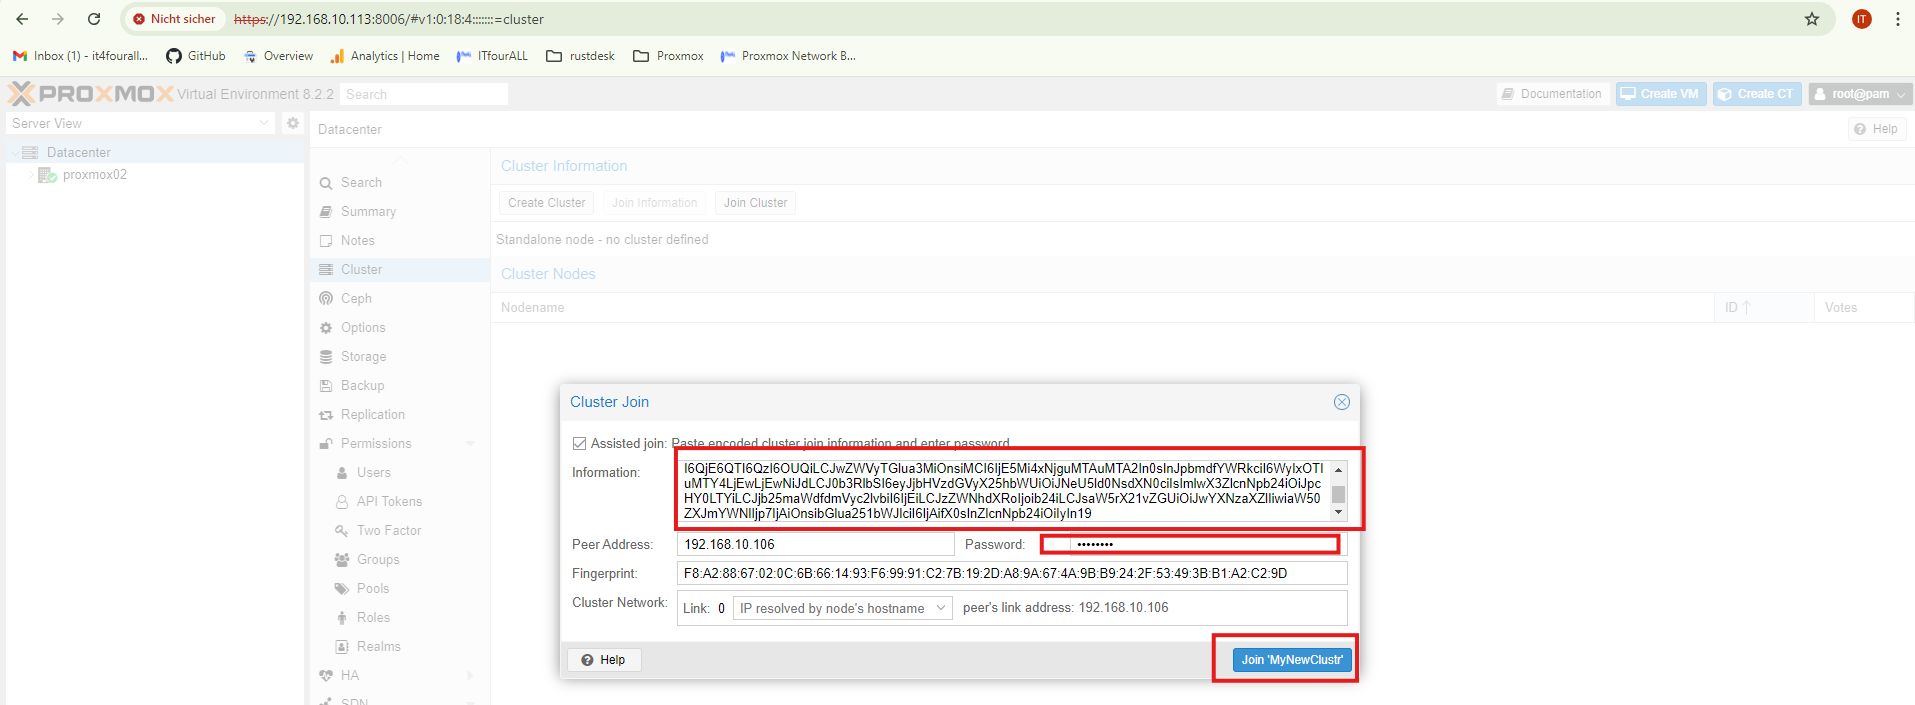
Next, we will transfer the information from Node1 to Node2 and add Node2 to the cluster. You will also need to enter the root password. To prevent issues, all nodes in the cluster must have the same root password.
The peer address is included in the information you copied. It is important that if you are using a different network card for synchronization, the networks on each node are correctly configured and connected to the same network.
Click here for the network basics.
It will now take some time for the nodes to synchronize. Please be patient, and then refresh the page because the Node will the first time froze. That´s normal !
The creation of the cluster is now complete. Next, we will move on to a new section focused on setting up high availability.
1. Create Storage
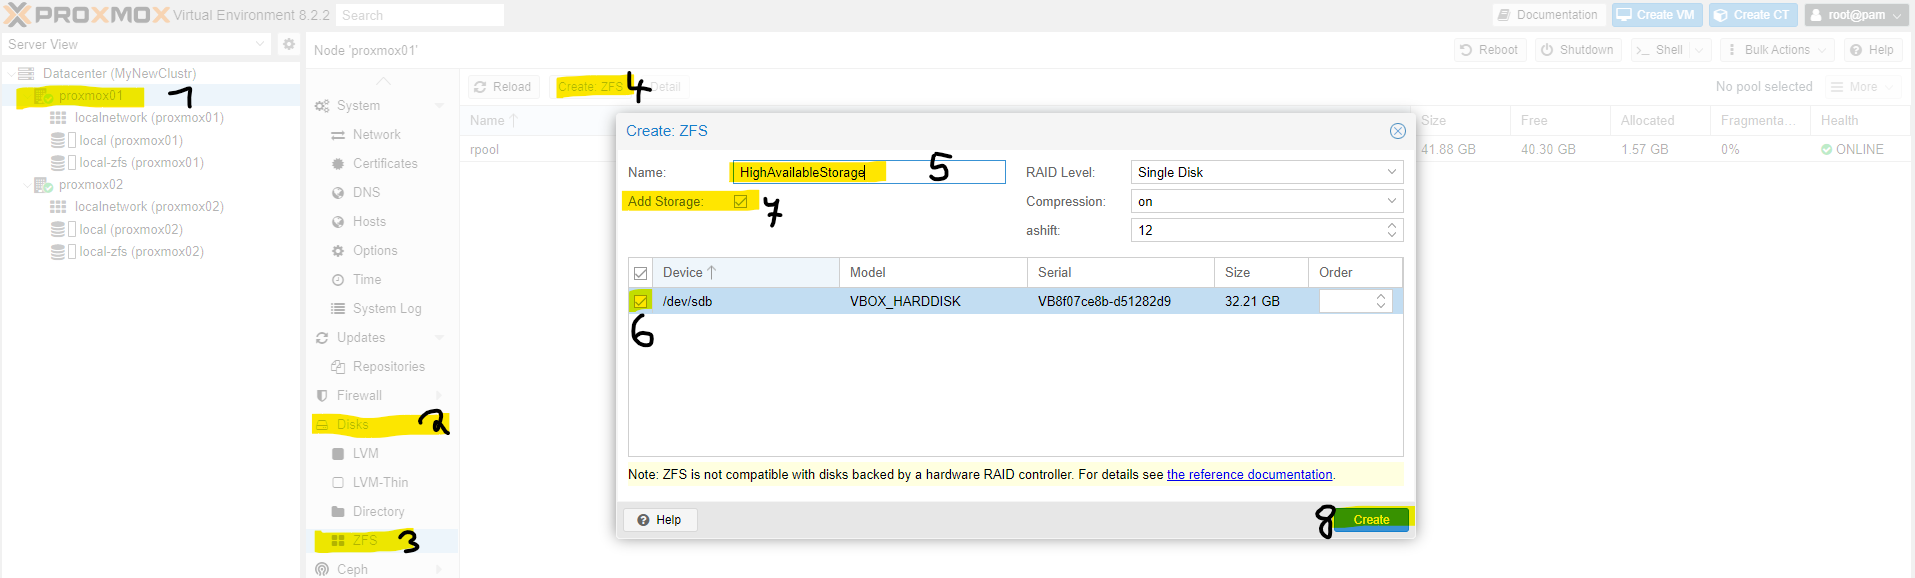
In order to ensure that the virtual machines are highly available, the data of the machines must be available on all nodes. Therefore, each node must provide storage. Each node must have an additional hard drive, and these must also have the **same storage capacity**.
Each node has **separate storage** for high availability. For example, if I create a virtual machine on Node1, the **data is also stored on the other nodes**.
In this example, I create a **storage pool on Node 1** and then **add Node 2 to the storage pool**.
At point 7, the storage is created.
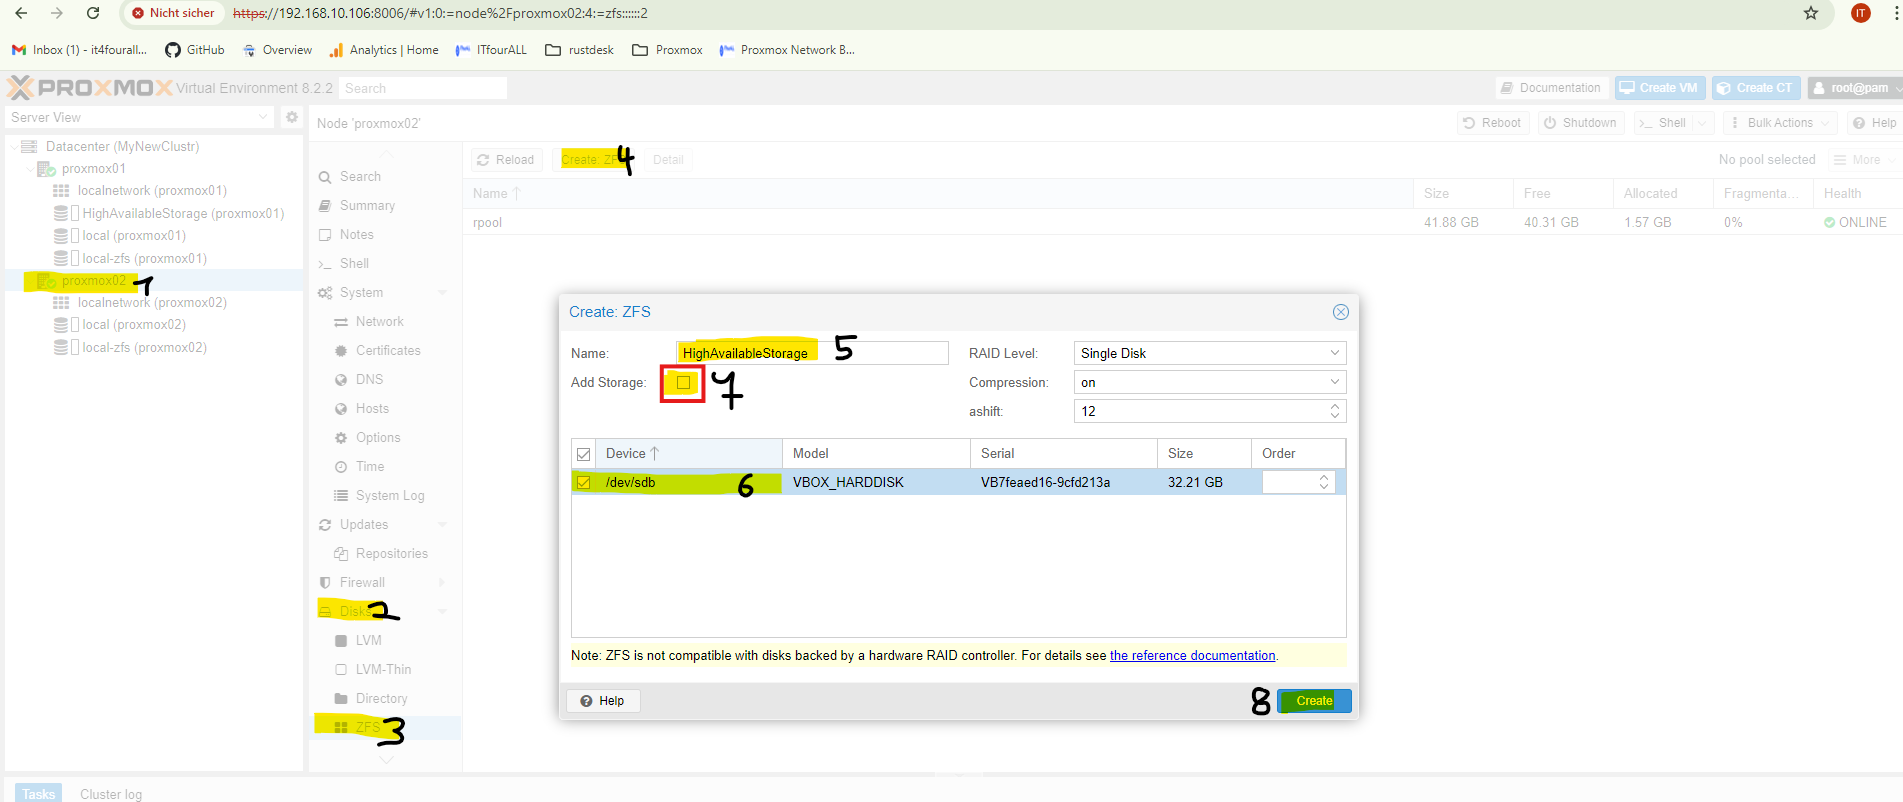
2. Add Node2 to the storage
Now we add **Node2** to the **storage pool**. IMPORTANT: The created **pool name** is the **ID of the pool** and must be entered **exactly the same** on the nodes that are added to the pool.
So again, at **point 5**, the **same name** as the created pool on **Node1** must be used, and at **point 7**, the checkbox **must not be checked**.
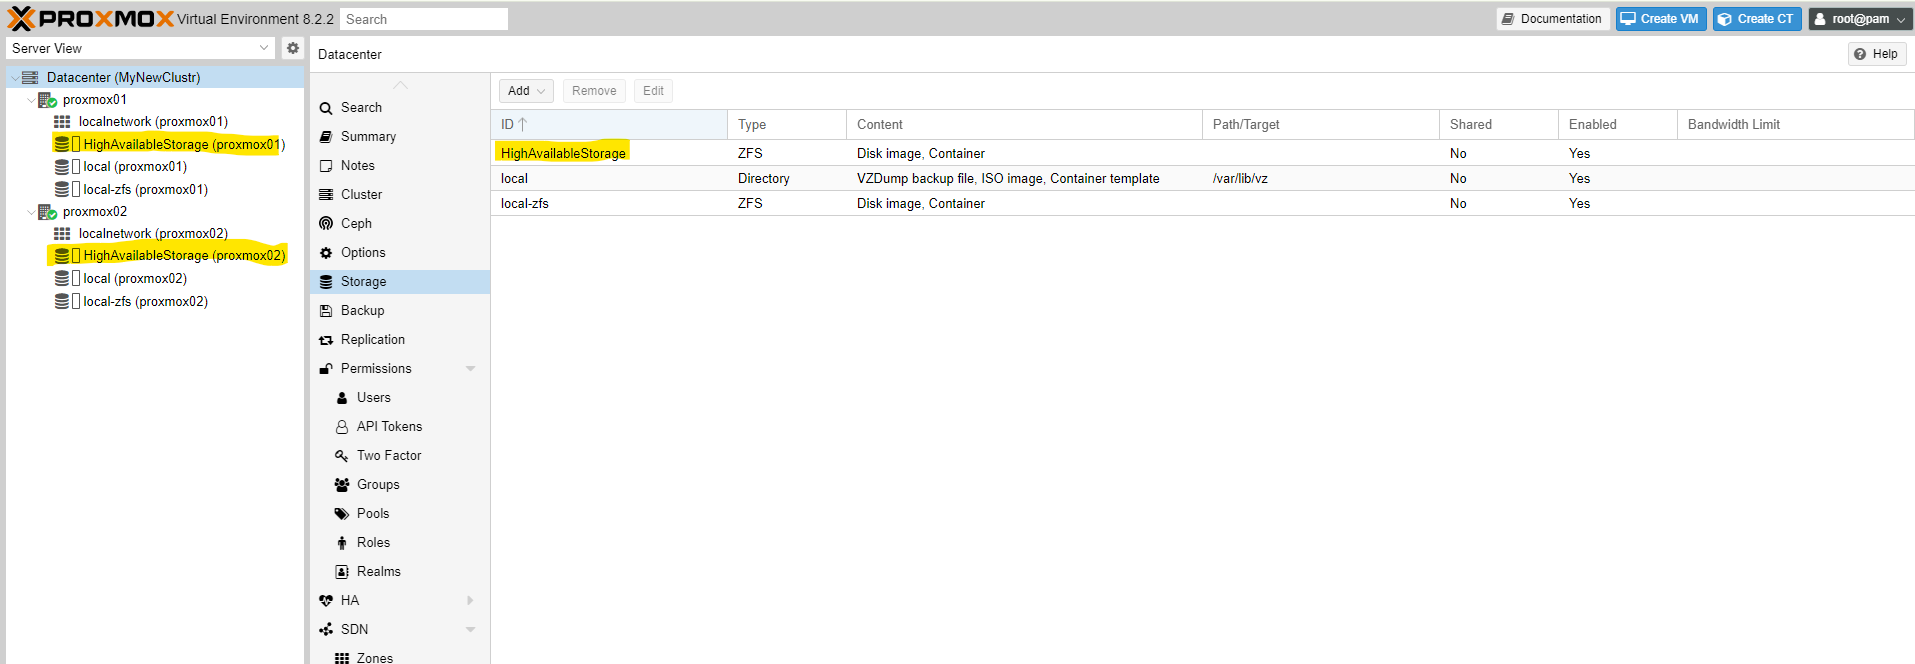
3. Share the Storage on all Nodes
Here we select the nodes that need to be **highly available**. Just a reminder, you can add as many nodes as you want to the cluster; the process for adding them remains **the same**.
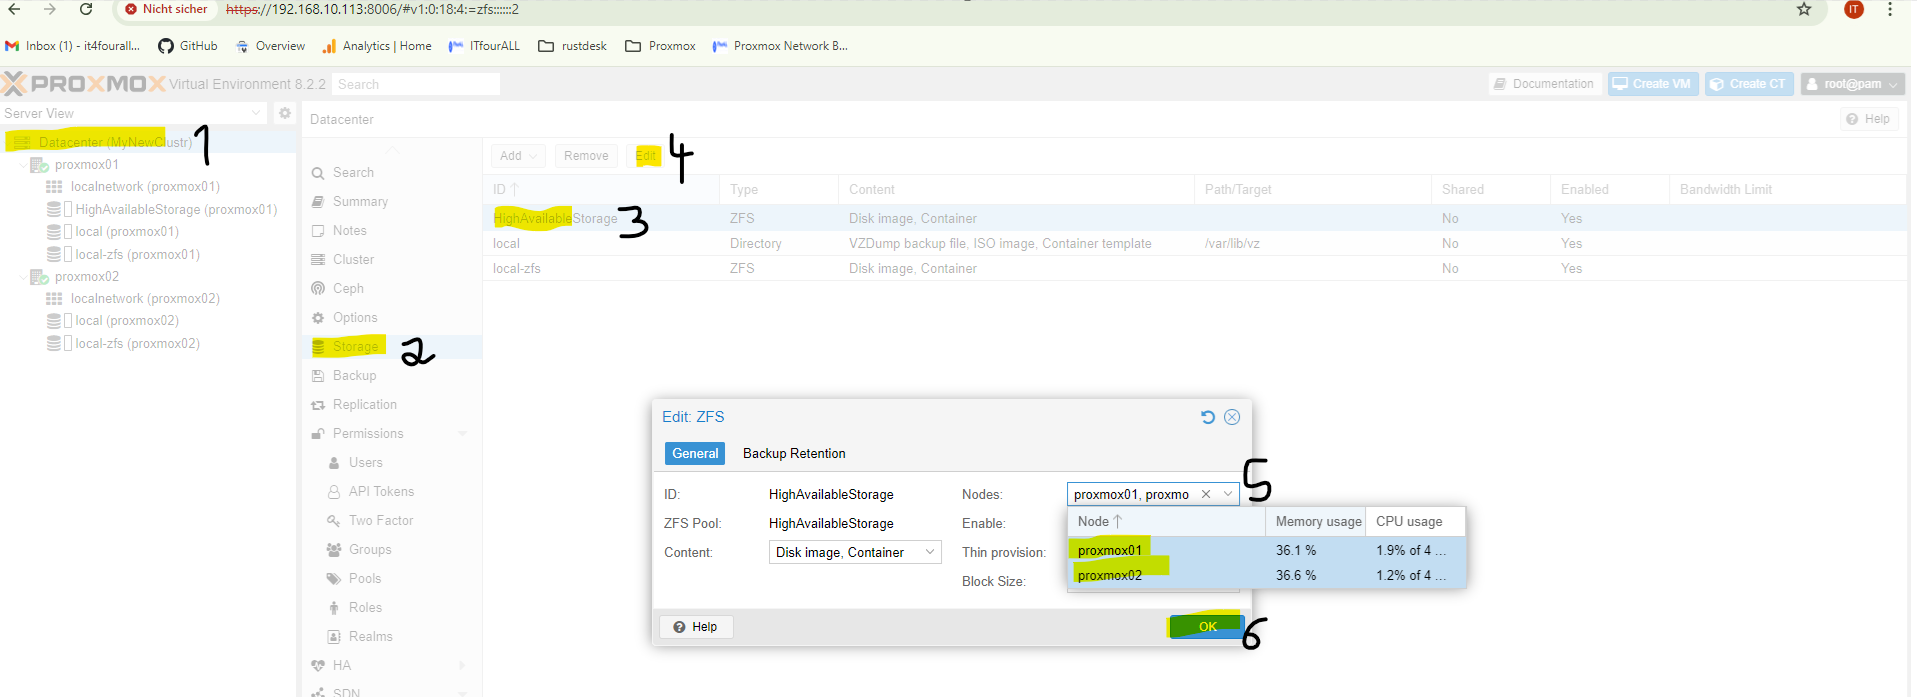
Now the **storage is set up on all nodes**.
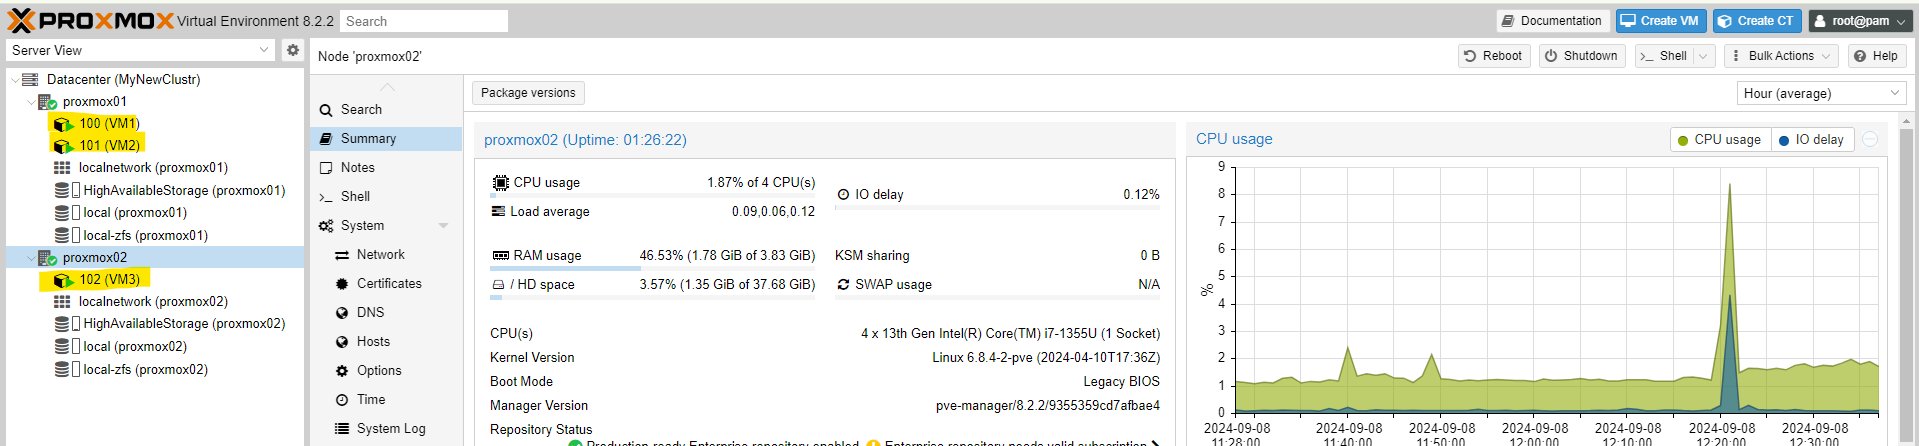
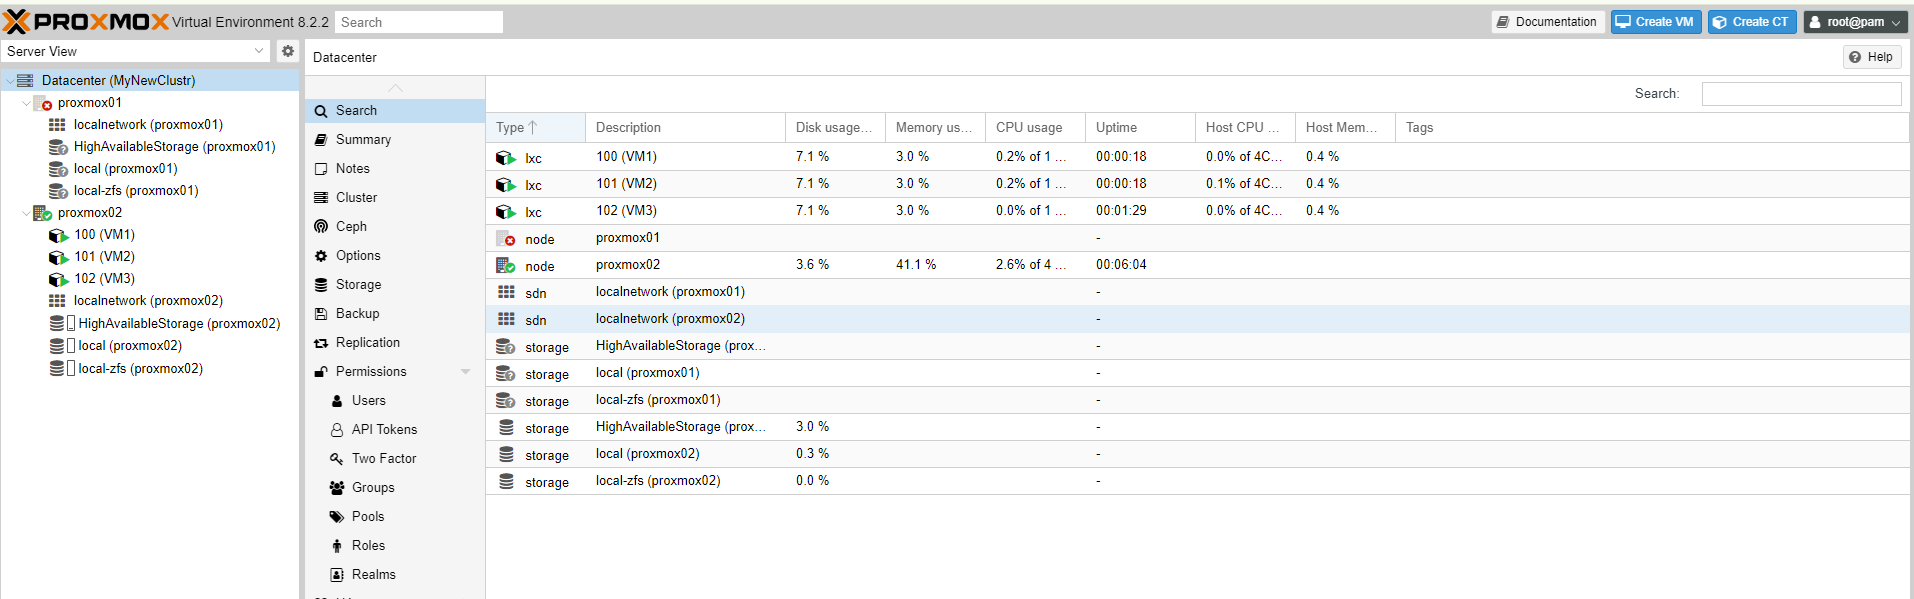
I have now created 3 test virtual machines: **VM1** and **VM2** on **Node1** and **VM3** on **Node2**. During the installation of the virtual machines, you need to select a storage. For this, you should choose the **high availability storage**.
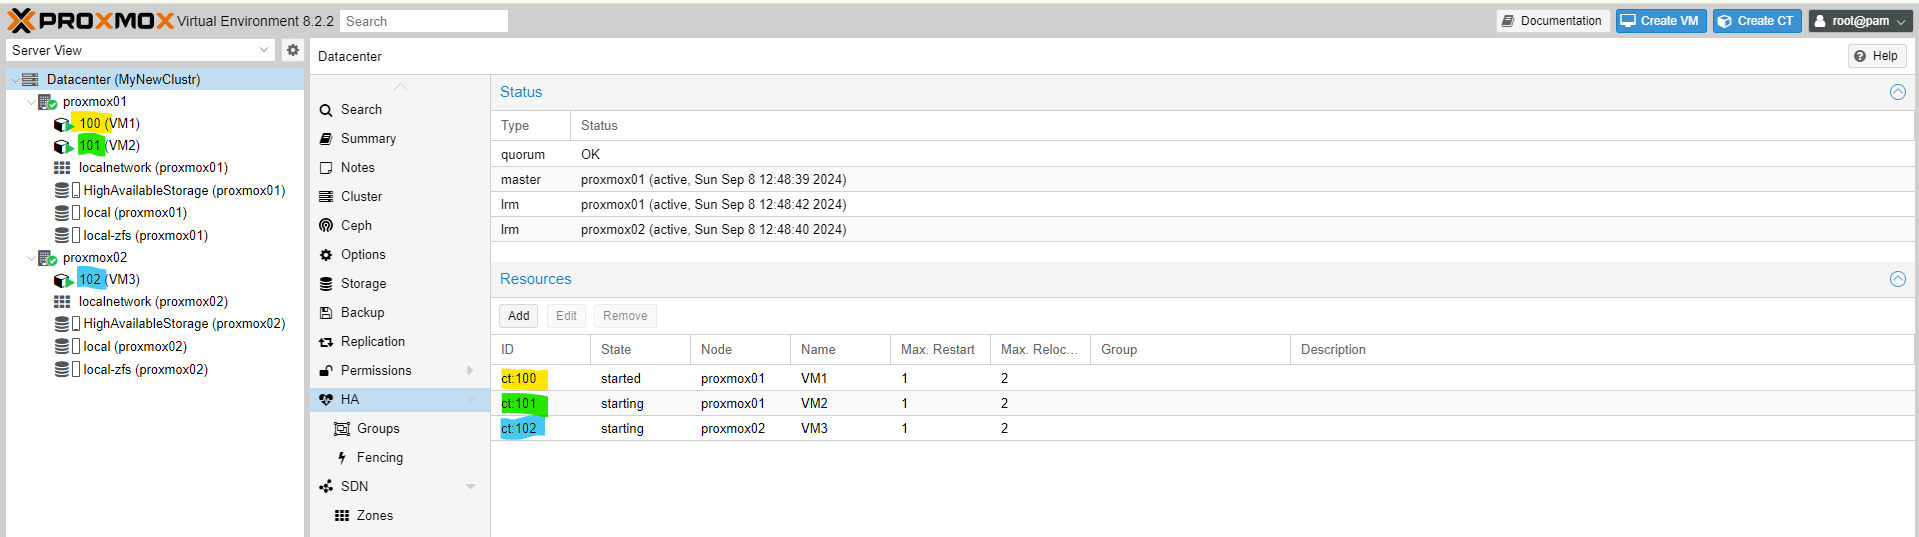
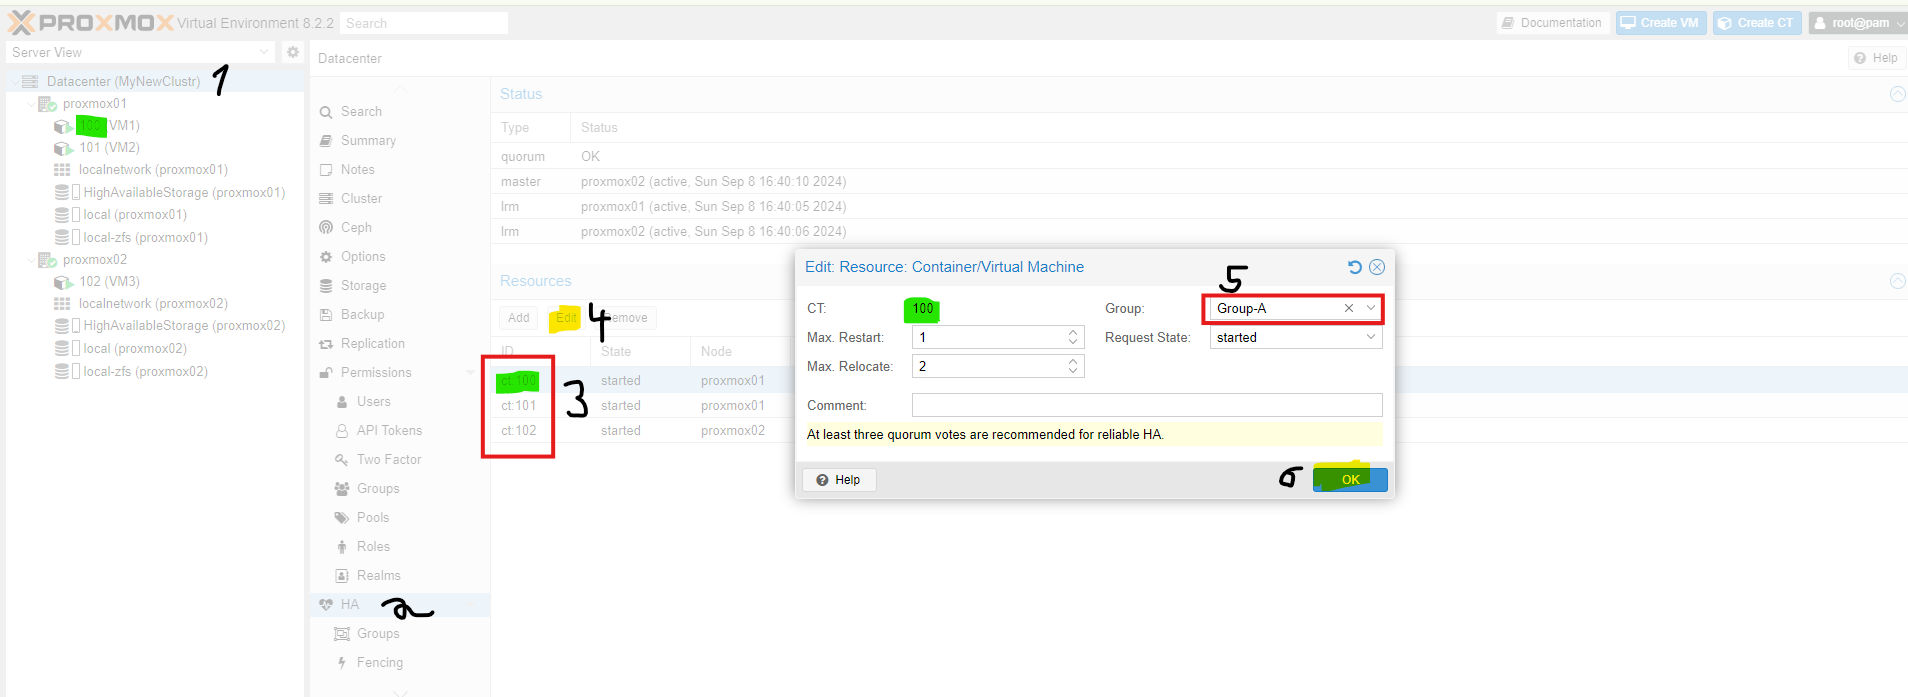
Now we select the machines that need to be **highly available**.

Now I will explain what **Max.Start** and **Max.Relocate** mean:
Max.Start is the number of maximum start attempts. For example, if it is set to **5**, Proxmox will attempt to start the machine up to **5 times**. If the machine still does not start, it will remain **turned off**.
Max.Relocate determines how many times the machine will be relocated to other nodes if it does not start. If you only have **2 nodes**, it does not make much sense to set Proxmox to relocate the machine **10 times**, as it would only be moved in a **circular pattern**.
Each virtual machine must be added **separately**.
Now we will create groups so that the system knows where to move the machines in case of a failure. I will create **Group A**. In this group, the machines that are part of **Group A** should normally run on **Node1**, and if **Node1** fails, these machines should start on **Node2**.
The higher the **numerical value**, the higher the **priority**.
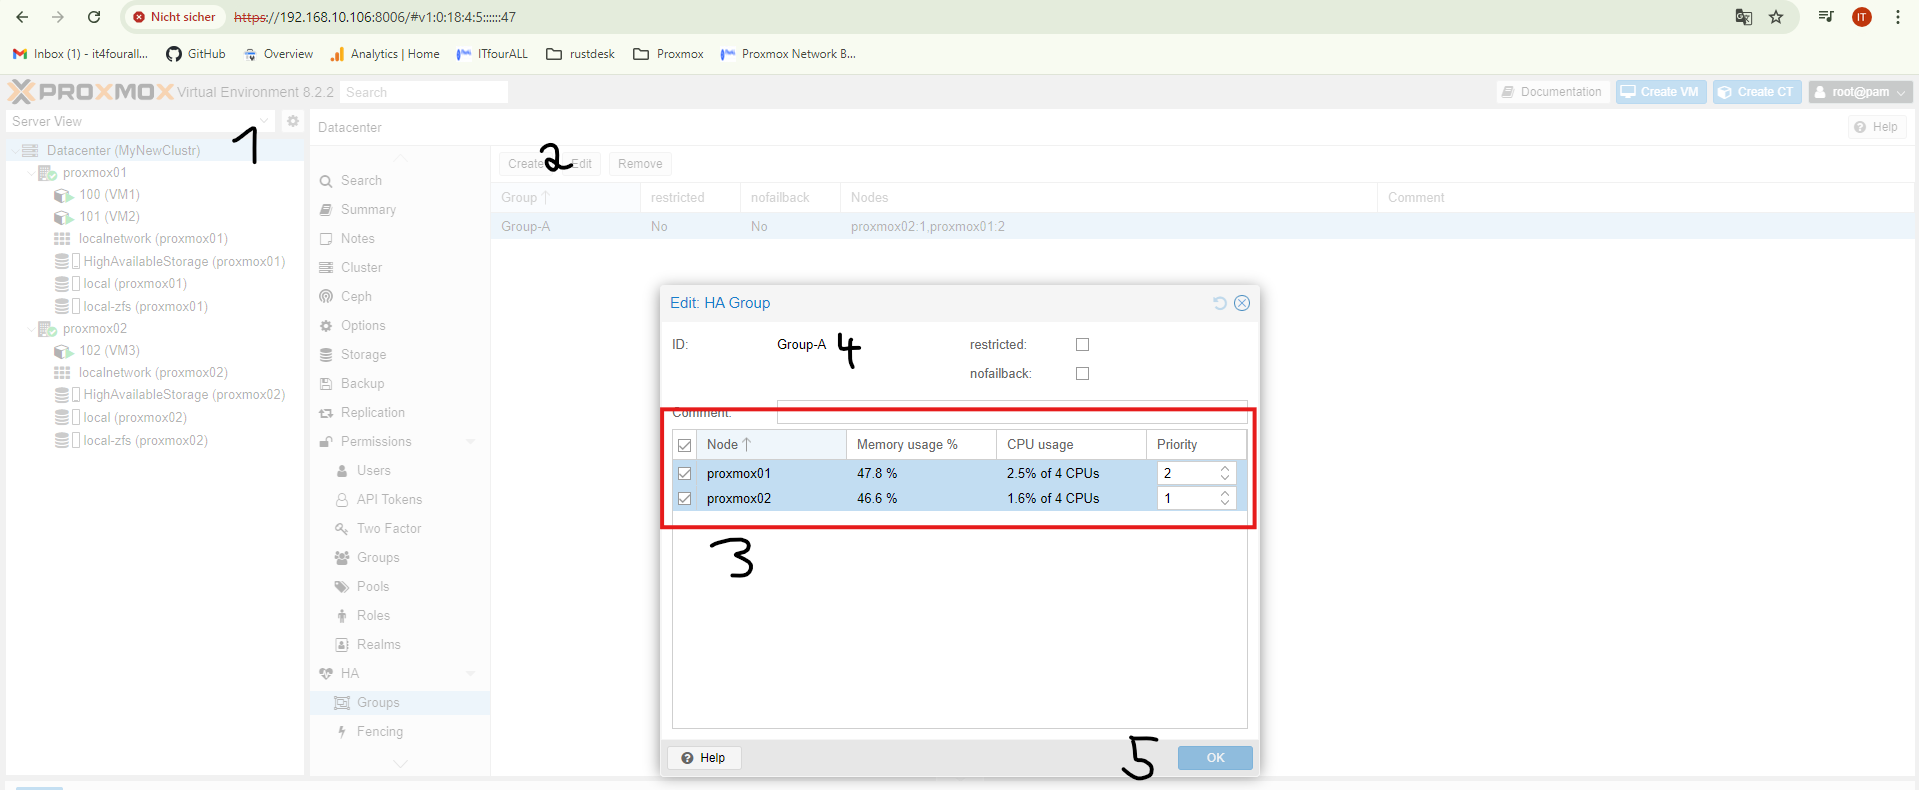
Now we add the virtual machines to the group. I want the machines from **Node1** to be in **Group A**. If **Node1** fails, they will be started on **Node2**.
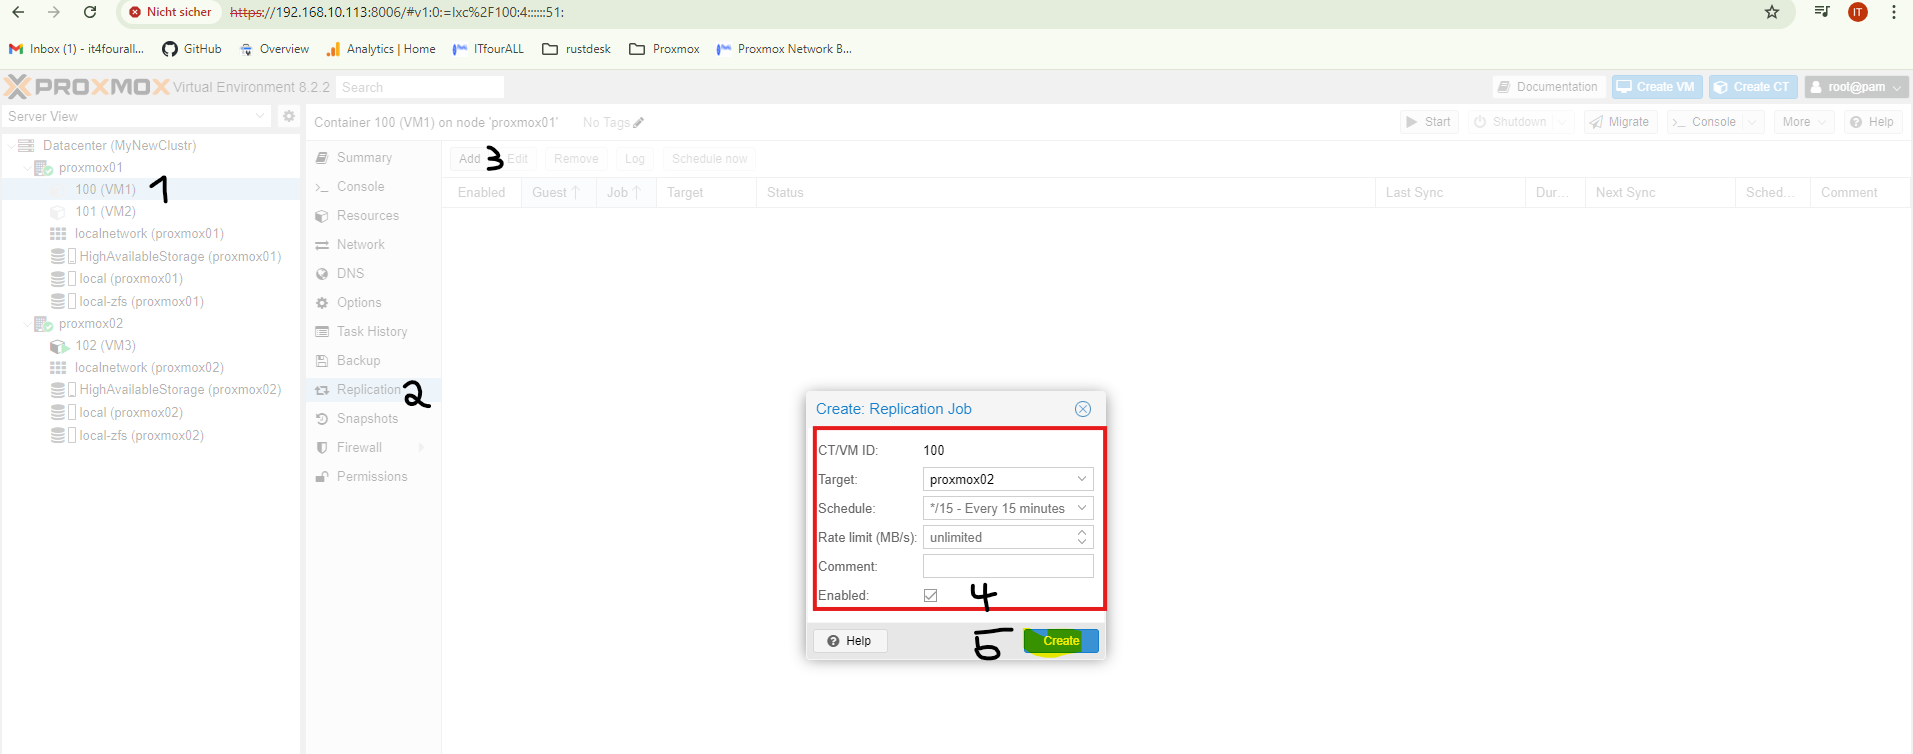
Now we configure how the data from **Node1** is replicated to **Node2**. This setting is applied to **each machine** and on **each node**.
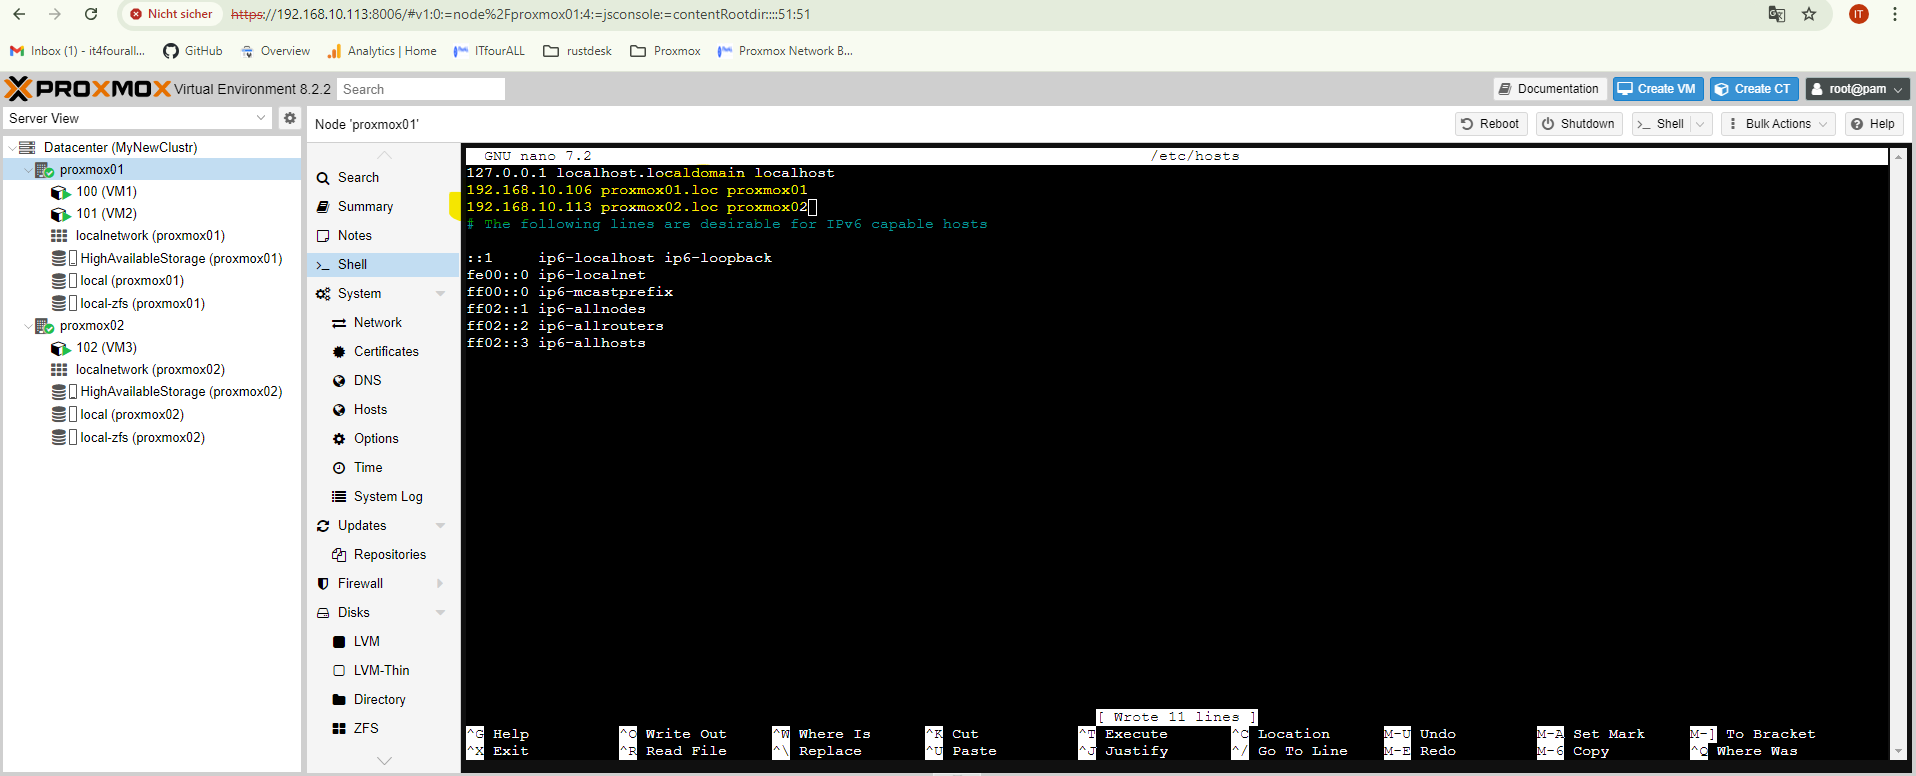
Now let's enter the hostname of Node1 into Node2 and vice versa.
To get the hostname of a node, use this command:
hostname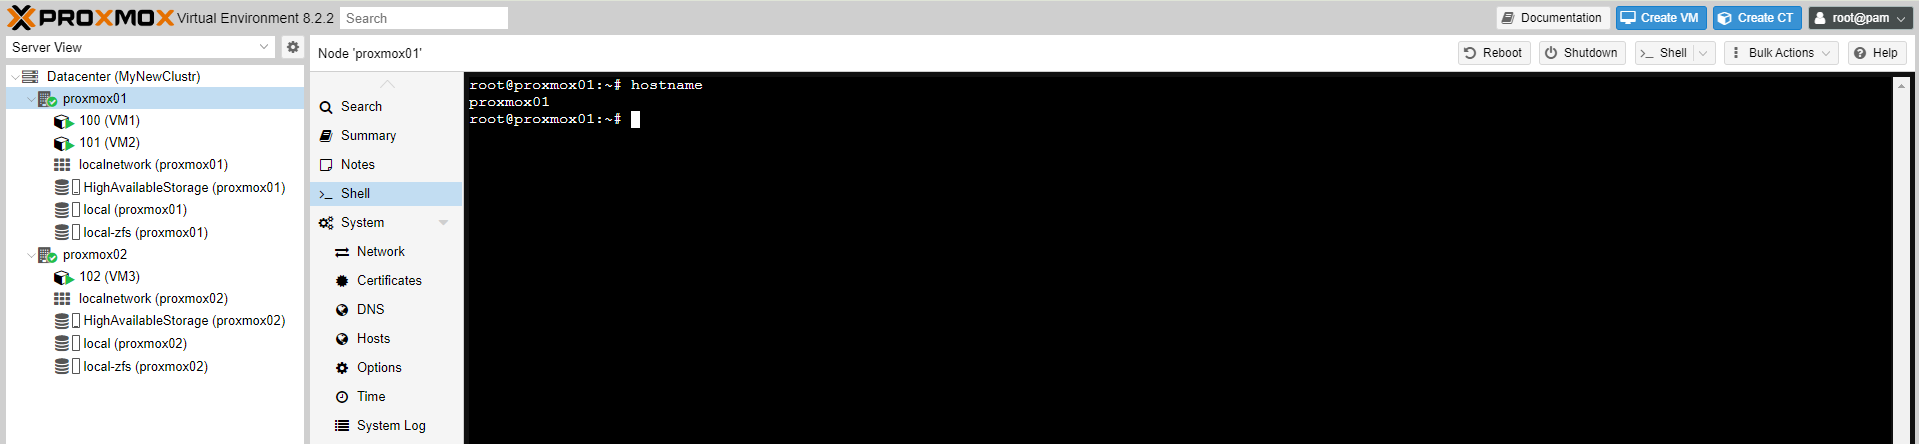
Now let's open this entry:
nano /etc/hosts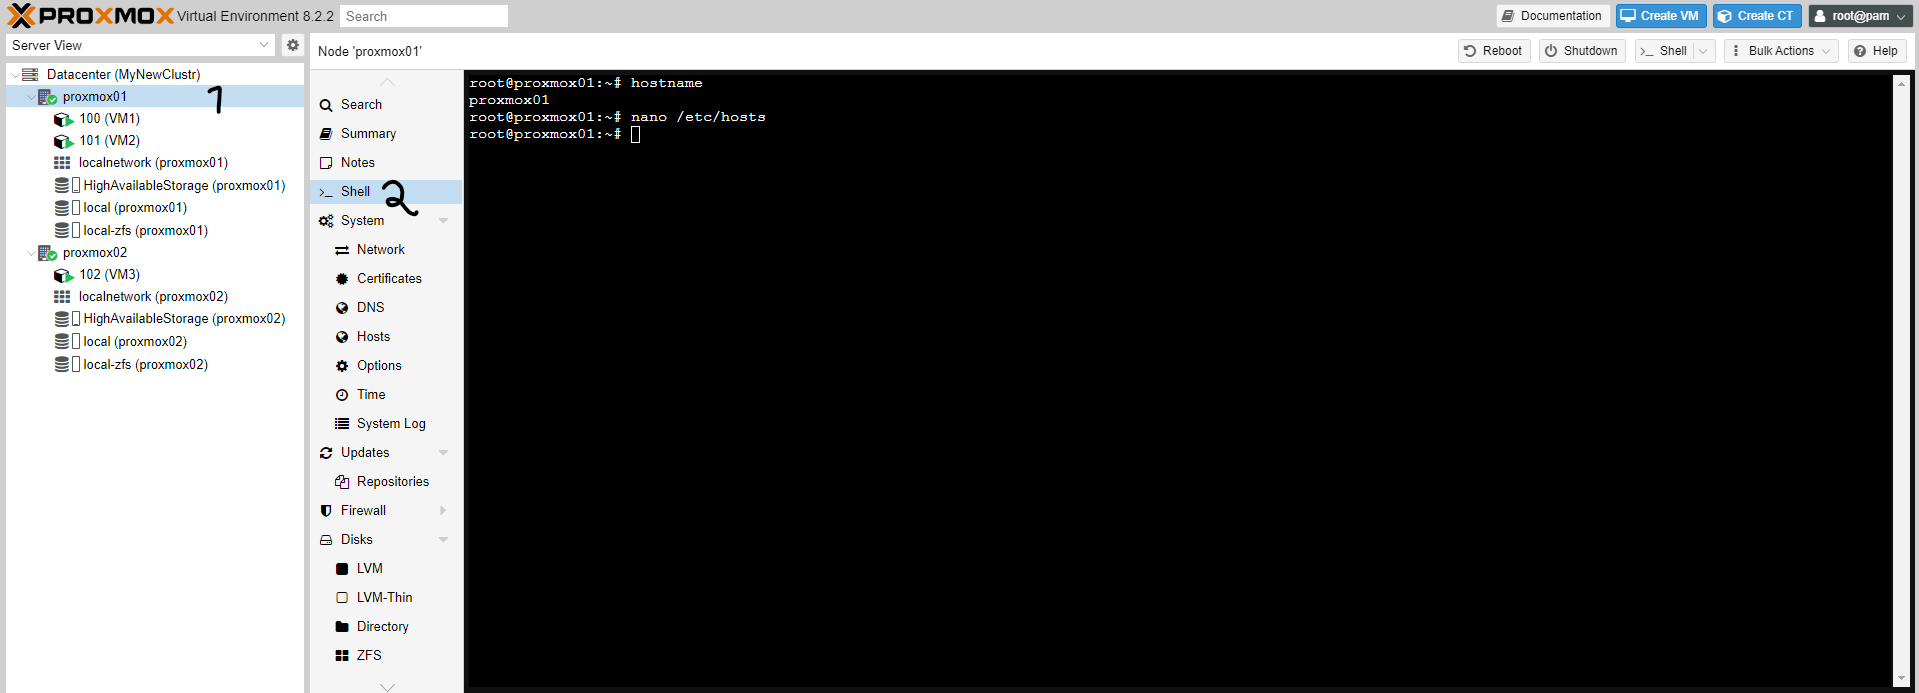
In this step, you need to ensure that all hostnames of all nodes are listed in the /etc/hosts file. Each node must be able to resolve the DNS names of the other nodes.
Now, let's simulate a failure by shutting down one node and verifying that the other node takes over. Follow these steps:
1. Prepare for Failure Simulation
- Ensure that your cluster is configured for high availability and that all nodes are properly set up.
- Verify that the failover settings are correctly configured for your virtual machines (VMs). Each VM should be assigned to the appropriate HA group and have the failover settings correctly applied.
- Check the status of the cluster to ensure everything is operational:
pvecm status2. Shut Down One Node
- On the node you want to simulate as failed (e.g., Node1), shut it down or power it off. You can do this from the command line:
- Alternatively, you can power off the machine physically or use a hypervisor management tool to shut it down.
sudo shutdown now3. Verify Failover on the Remaining Node
- After shutting down the node, check the status of the remaining node (e.g., Node2) to ensure it has taken over the VMs and other services:
- Verify that the VMs previously running on the failed node have been migrated to the remaining node and are running correctly. Check the VMs’ status and logs to ensure they are operating as expected:
- Inspect the cluster logs for any errors or issues related to the failover process:
pvecm statusqm status <VM_ID>cat /var/log/pve-cluster.log4. Reactivate the Failed Node
- Once the simulation is complete, power on the previously shut-down node (e.g., Node1):
- Verify that the node rejoins the cluster and that all services and VMs are properly restored:
- Ensure that the cluster is back to its normal state and that the high availability settings are functioning correctly.
sudo poweronpvecm statusBy following these steps, you can simulate a node failure and ensure that your cluster’s high availability setup is working as expected. This helps to validate that failover procedures are correctly configured and operational.
Important Information
If a node fails in your Proxmox cluster, it's crucial to ensure the cluster continues to operate smoothly. One essential step is to adjust the expected votes using the command pvecm expected 1. Here's a brief guide:
When a Node Fails
When a node in the Proxmox cluster goes down, you need to adjust the cluster's quorum and expected votes. This adjustment ensures proper functionality and failover behavior. The command pvecm expected 1 sets the expected number of votes to 1, which helps maintain quorum and allows the remaining nodes to function correctly.
If 3 nodes are available in the cluster, this solution is normally not needed. When only 2 nodes are available in the cluster, complications arose during my test setup. Node1 failed, and Node2 then shut down its machines and replication did not work. With the script below, which must run on both nodes, the node is allowed to continue working alone in the cluster in case of failure.
Using the Command
To set the expected votes to 1, run the following command on one of the remaining active nodes:
pvecm expected 1This command updates the cluster configuration to reflect the reduced number of active nodes, helping to prevent issues until the failed node is restored.
Option 1: Script for Automatically Setting Expected Votes, create this Skript on all Nodes to prevent problems
Make update
apt updateInstall sudo
apt install sudo -yCreate a Script:
Create a new file for the script, e.g., /usr/local/bin/set_pvecm_expected.sh:
sudo nano /usr/local/bin/set_pvecm_expected.shAdd the following content to the script:
#!/bin/bash

# Check the status of the cluster
CLUSTER_STATUS=$(pvecm status)

# Check if the cluster nodes have the correct number of votes
if [[ $CLUSTER_STATUS == *"Quorum: 2"* ]]; then
    echo "Cluster has quorum, no changes needed."
else
    echo "Cluster does not have quorum. Setting expected votes to 1."
    pvecm expected 1
fi
Make the Script Executable:
sudo chmod +x /usr/local/bin/set_pvecm_expected.shAdd the Script to a Cron Job to Run Regularly:
Edit the cron table with crontab -e and add a line to run the script every 5 minutes:
*/5 * * * * /usr/local/bin/set_pvecm_expected.shOption 2: Using Proxmox HA Management
Proxmox also offers high availability (HA) management options that allow you to automatically adjust configurations when a node fails. Ensure that you have properly configured HA settings to ensure better fault tolerance.
Summary
You can automate the pvecm expected 1 command by either adjusting Corosync configuration files, using a script, or leveraging Proxmox's built-in HA management options. Using a regular script to check the cluster status and adjust the expected votes is a flexible way to ensure that your cluster functions correctly even in the event of node failures.