ITfourALL

How to Install a Self-Signed SSL Certificate in Apache 2: Step-by-Step Guide
Securing your Apache server with SSL is essential for protecting data and ensuring secure communication. In this guide, we'll walk you through the process of installing a self-signed SSL certificate on Apache 2.
Step 1: Create a Folder for the SSL Certificate
Create a folder for the certificate and the key:
Choose an appropriate location for the folder, e.g., /etc/ssl/privatecert
mkdir /etc/ssl/privatecertStep 2: Change to the Folder
Navigate to the folder you just created:
cd /etc/ssl/privatecertStep 3: Generate a Self-Signed Certificate with OpenSSL
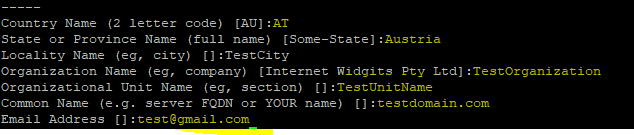
Use the following command to generate a self-signed certificate:
sudo openssl req -x509 -nodes -days 365 -newkey rsa:2048 -keyout /etc/ssl/privatecert/mydomain.key -out /etc/ssl/privatecert/mydomain.crtReplace /etc/ssl/privatecert/mydomain.key and /etc/ssl/privatecert/mydomain.crt with the appropriate paths and filenames for your setup. You will be prompted to enter details such as your country, state, and common name (domain name).

Activating SSL in Apache
Step 1: Enable the SSL Module
First, ensure that the SSL module is enabled in Apache. You can do this with the following command:
sudo a2enmod sslStep 1: Open the `default-ssl.conf` File for Editing
You can open the default SSL configuration file with a text editor like nano or vim. In this example, we'll use nano:
sudo nano /etc/apache2/sites-available/default-ssl.confStep 2: Edit the Configuration File
Update the configuration file to point to your self-signed certificate and key. Here is an example of the content you should insert or adjust:
<IfModule mod_ssl.c>
	<VirtualHost _default_:443>
		ServerAdmin webmaster@mydomain.com
		ServerName mydomain.com
		DocumentRoot /var/www/html

		SSLEngine on
		SSLCertificateFile /etc/ssl/private/mydomain.crt
		SSLCertificateKeyFile /etc/ssl/private/mydomain.key

		<FilesMatch "\\.(cgi|shtml|phtml|php)$">
			SSLOptions +StdEnvVars
		</FilesMatch>
		<Directory /usr/lib/cgi-bin>
			SSLOptions +StdEnvVars
		</Directory>

		ErrorLog ${APACHE_LOG_DIR}/error.log
		LogLevel warn
		CustomLog ${APACHE_LOG_DIR}/access.log combined
	</VirtualHost>
	</IfModule>
Explanation of Key Lines:
ServerAdmin: The webmaster's email address.ServerName: The name of your domain.DocumentRoot: The path to the root directory of your website.SSLEngine on: Enables SSL for this virtual host.SSLCertificateFile: The path to the SSL certificate file.SSLCertificateKeyFile: The path to the private key file.
Step 3: Save and Close
If you're using nano, save the file with Ctrl+O, press Enter to confirm, and close nano with Ctrl+X.
Step 4: Enable the SSL Site Configuration
If not already enabled, make sure the SSL site configuration is activated:
sudo a2ensite default-ssl.confsudo a2enmod sslStep 5: Restart Apache
Restart Apache to apply the changes:
sudo systemctl restart apache2Checking Your Domain with SSL
To verify that your SSL configuration is working, follow these steps:
- Ensure that your DNS name resolves correctly to your server's IP address. This can be done by using tools like
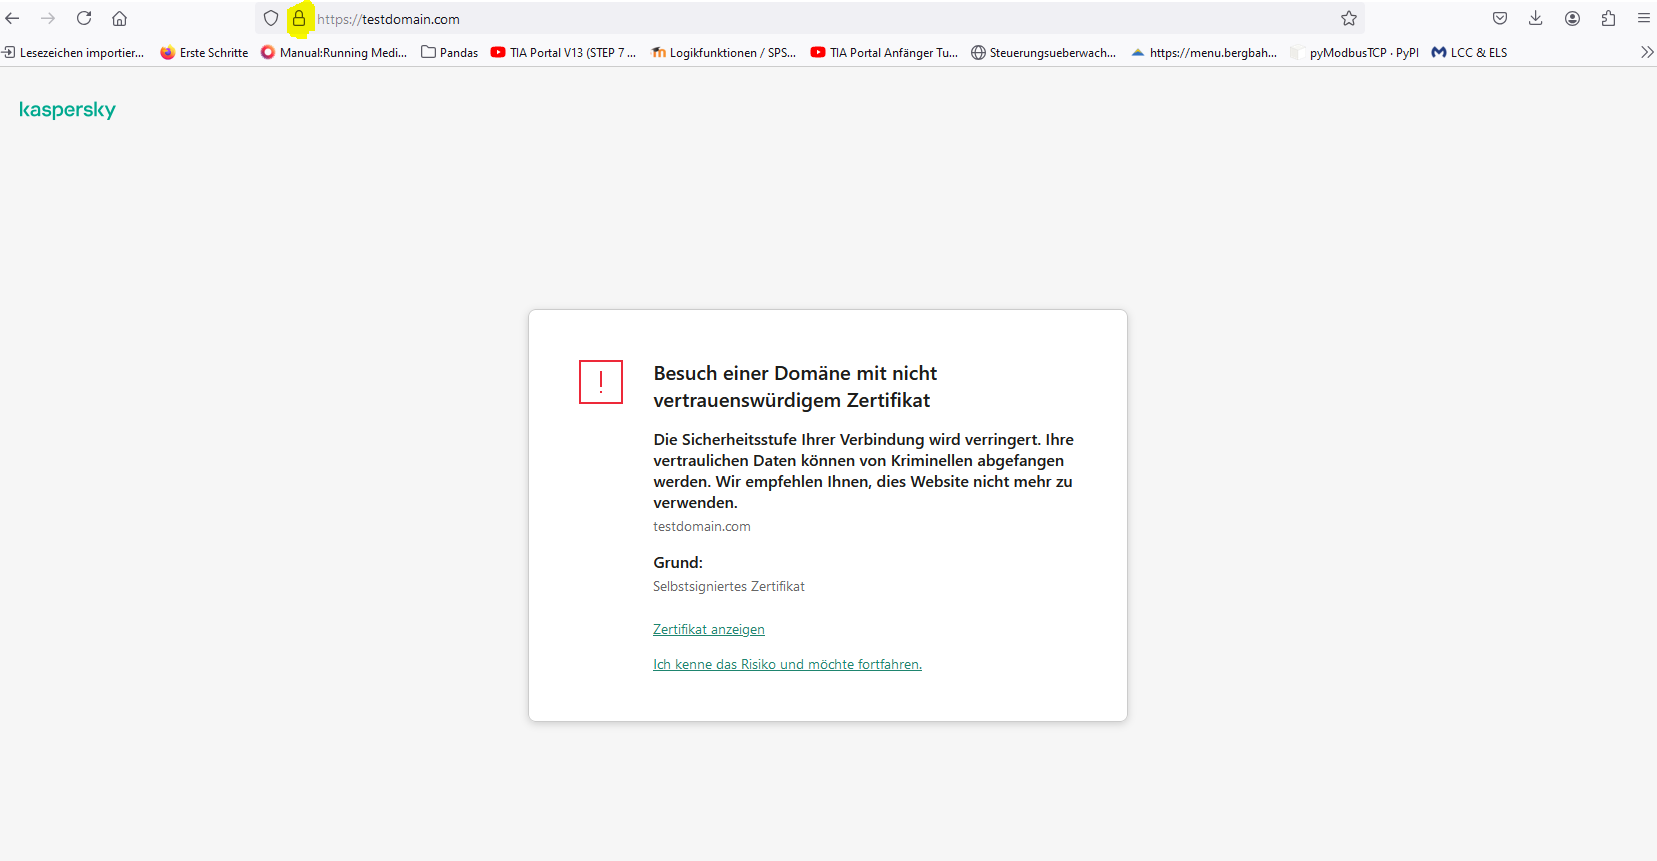
nslookupordig. - Open your web browser and navigate to https://testdomain.com.
- You might see a warning that the certificate is not secure. This is expected if you're using a self-signed certificate.
- Despite the warning, check for the padlock icon in the URL bar of your browser. This indicates that the SSL connection is active and functioning.
Note: Self-signed certificates are not trusted by default, so the browser will show a warning. However, the padlock icon confirms that SSL is working correctly.
Troubleshooting and Configuration for Apache SSL
If your Apache SSL configuration is not working as expected, follow these steps to troubleshoot and ensure correct setup:
1. Check Apache Configuration
Run the following command to test the Apache configuration for syntax errors:
sudo apachectl configtestAddress any syntax errors indicated in the output.
2. Verify File Paths and Permissions
Ensure that the paths to your SSL certificate and key are correct and that Apache has access to these files. Check the permissions with:
ls -l /etc/ssl/privatecert/Adjust permissions if necessary:
sudo chmod 600 /etc/ssl/privatecert/mydomain.keysudo chmod 644 /etc/ssl/privatecert/mydomain.crt3. Review Apache Error and Access Logs
Check the logs for error messages:
sudo tail -f /var/log/apache2/error.logsudo tail -f /var/log/apache2/access.log4. Ensure SSL Module is Enabled
Confirm that the SSL module is enabled with:
sudo a2enmod sslRestart Apache to apply changes:
sudo systemctl restart apache25. Verify `default-ssl.conf` Configuration
Ensure the configuration file is correct. Example configuration:
<IfModule mod_ssl.c>
<VirtualHost _default_:443>
    ServerAdmin webmaster@testdomain.com
    ServerName testdomain.com
    DocumentRoot /var/www/html

    SSLEngine on
    SSLCertificateFile /etc/ssl/privatecert/mydomain.crt
    SSLCertificateKeyFile /etc/ssl/privatecert/mydomain.key

    <FilesMatch "\.(cgi|shtml|phtml|php)$">
        SSLOptions +StdEnvVars
    </FilesMatch>
    <Directory /usr/lib/cgi-bin>
        SSLOptions +StdEnvVars
    </Directory>

    ErrorLog ${APACHE_LOG_DIR}/error.log
    LogLevel warn
    CustomLog ${APACHE_LOG_DIR}/access.log combined
</VirtualHost>
</IfModule>
6. Enable the SSL Site
Ensure the site is enabled and restart Apache:
sudo a2ensite default-ssl.confsudo systemctl restart apache27. Test HTTPS Access
Try accessing your website using HTTPS to confirm it’s working:
https://testdomain.comApache Startup Process and Configuration Loading
Here’s a step-by-step overview of how Apache processes its configuration files during startup:
1. Start the Apache Daemon
When you start the Apache web server (e.g., with the command sudo systemctl start apache2), the Apache daemon (apache2 on Debian-based systems or httpd on Red Hat-based systems) is started.
2. Load the Main Configuration File
Apache begins the startup process by reading its main configuration file, which might be apache2.conf or httpd.conf, depending on your system and Apache version.
This file contains fundamental settings for the web server, including paths to other configuration files and directories.
3. Include Global Configurations
The main configuration file often includes Include directives that specify additional configuration files for Apache to read.
For example, a line like Include /etc/apache2/ports.conf in the main configuration file includes additional settings.
4. Include Available and Enabled Sites Directories
Apache looks for further configurations in the sites-available and sites-enabled directories.
The main configuration file or other configuration files include directives pointing to the sites-enabled directory, typically like this:
Include /etc/apache2/sites-enabled/*.confThis directive tells Apache to read all configuration files in the sites-enabled directory. Files in sites-available are not active by default.
5. Enable Configurations
In sites-available, you’ll find configuration files for various virtual hosts, including SSL configurations like default-ssl.conf.
To activate a configuration file, a symbolic link is created from sites-available to sites-enabled. This link is created using the command a2ensite:
sudo a2ensite default-ssl.confThis command creates a symbolic link in sites-enabled that points to the configuration file in sites-available.
6. Load Enabled Configurations
During startup, Apache reads all configuration files in the sites-enabled directory.
The default-ssl.conf will be read and processed because the symbolic link in sites-enabled is present.
7. Process SSL Configuration
In default-ssl.conf, specific settings for SSL are defined, including paths to SSL certificates and keys.
Apache activates SSL for the virtual host configured in this file. Example configuration:
<IfModule mod_ssl.c>
<VirtualHost _default_:443>
    SSLEngine on
    SSLCertificateFile /etc/ssl/privatecert/mydomain.crt
    SSLCertificateKeyFile /etc/ssl/privatecert/mydomain.key
    ...
</VirtualHost>
</IfModule>
8. Start the Web Server
After all configuration files are read and processed, Apache starts the web server and begins processing requests.
SSL is now active for the virtual host defined in default-ssl.conf.
Summary
Apache starts and loads its main configuration file.
Global configurations are included, referencing other configuration files and directories.
Directories for available and enabled sites are read, with Apache processing the enabled sites from sites-enabled.
Enabled configuration files, including SSL configurations like default-ssl.conf, are read and processed.
SSL is activated, and Apache begins processing requests.
This structured startup process ensures that Apache loads and applies all necessary configurations to operate the web server correctly and securely.
Apache sites-available vs. sites-enabled
1. sites-available
Purpose: This directory contains all available configuration files for virtual hosts on the Apache web server. Here, you store configuration files that you might want to use.
Example: You might place a configuration file for a new website or an SSL configuration here before activating it.
/etc/apache2/sites-available/
├── 000-default.conf
├── default-ssl.conf
└── my-new-site.conf
Function: Configuration files in this directory are not used automatically. They need to be explicitly activated to be considered by the Apache web server.
2. sites-enabled
Purpose: This directory contains symbolic links (symlinks) to the configuration files in sites-available that are currently activated and used by the Apache web server.
Example: When you activate a configuration file from sites-available, a link is created in sites-enabled.
/etc/apache2/sites-enabled/
├── 000-default.conf -> /etc/apache2/sites-available/000-default.conf
├── default-ssl.conf -> /etc/apache2/sites-available/default-ssl.conf
└── my-new-site.conf -> /etc/apache2/sites-available/my-new-site.conf
Function: Only the configuration files linked in this directory are loaded and applied by Apache. If you remove a configuration file or its link here, the corresponding configuration is deactivated.
Summary
sites-available: Stores all possible configuration files. They are not active until explicitly activated.
sites-enabled: Contains active configuration files through symbolic links. These configurations are used by Apache at startup or reload.
Example for Activation and Deactivation
Activate: To activate a configuration file, use the a2ensite command, which creates a symbolic link from sites-available to sites-enabled.
sudo a2ensite my-new-site.conf
Deactivate: To deactivate a configuration, use the a2dissite command, which removes the symbolic link from sites-enabled.
sudo a2dissite my-new-site.conf
Restart: After activating or deactivating configurations, restart Apache to apply the changes:
sudo systemctl restart apache2
This separation helps organize web server configuration management and allows for easy activation or deactivation of configurations without physically removing or changing them.