Mount SMB Storage on Linux with Samba

Mount SMB Storage on Linux with Samba Step by Step
Here, I will show you how to mount an SMB share on your Linux system. SMB is the most common protocol that enables network drive sharing. NAS storage devices like Synology or Qnap use this protocol, as well as a Windows file server, which also utilizes the SMB protocol. To mount SMB shares on your Linux system, you will need the Samba client, but I will explain everything step by step.
First, we will update the system. Enter the following command. You will need root privileges for everything to work. You can obtain root privileges with sudo or su.
apt updateTo make everything easier, we will install sudo. For the installation to be successful, we need root privileges.
apt install sudo -yNow we will install all the necessary packages so that we can mount SMB shares. Use the following command:
sudo apt install cifs-utils -ysudo apt install smb -yMounting an SMB share on Linux works very well, but first, you need to know the username that is allowed to access the share. There are two types of users to consider. You must know whether the user is created on the NAS itself, or if a domain user wants to securely connect to the NAS.
Furthermore, you need to know which SMB version the NAS is using: Version 1.0, Version 2.0, or Version 3.0. Version 2.0 is the most common. However, if you are unsure of the version, simply try all the available versions. I will provide the necessary commands for this.
Now let's get started. To establish a successful connection, we need the user credentials that have access to the share. We will write these credentials into a file.
You can name the file whatever you want, it just needs to be adjusted in all commands. If you want to mount a second drive, simply name it 'sudo nano /root/.smbcredentials2'.
sudo nano /root/.smbcredentialsNow a window will open where the user credentials need to be entered. At this point, you need to know whether the user is not part of a domain, meaning the user is created directly on the NAS.
Here, I am creating a user that is set up directly on the NAS.
My user is called "mount", and this user is created on the NAS.
Check if the user has read and write permissions on the NAS/Storage.

Save everything with CTRL + O and exit the editor.
Now adjust the permissions accordingly.
sudo chmod 600 /root/.smbcredentialsOptional: If your user is part of a domain, your file will look like this.
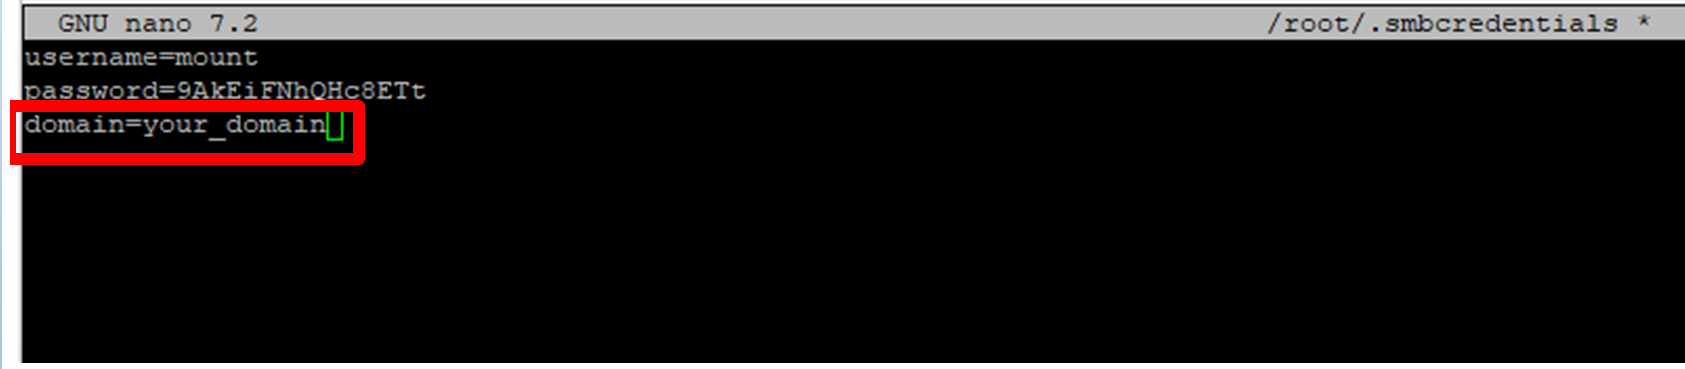
Save everything with CTRL + O and exit the editor.
Now adjust the permissions accordingly.
sudo chmod 600 /root/.smbcredentialsThe user credentials are now saved, and we will begin with the mount.
Before we mount the drive, we need to create a directory that will be used to connect the drive. We will create the folder nas_mountpoint, but you can choose any name you like. We will create this folder in the /mnt directory.
sudo mkdir /mnt/nas_mountpointThis is the basic command for mounting, where the SMB version is not explicitly specified. You can adjust this command with your settings, such as the NAS IP address, the shared folder, and the path to the folder where the drive will be linked.
sudo mount -t cifs -o credentials=/root/.smbcredentials //10.30.35.10/share /mnt/nas_mountpoint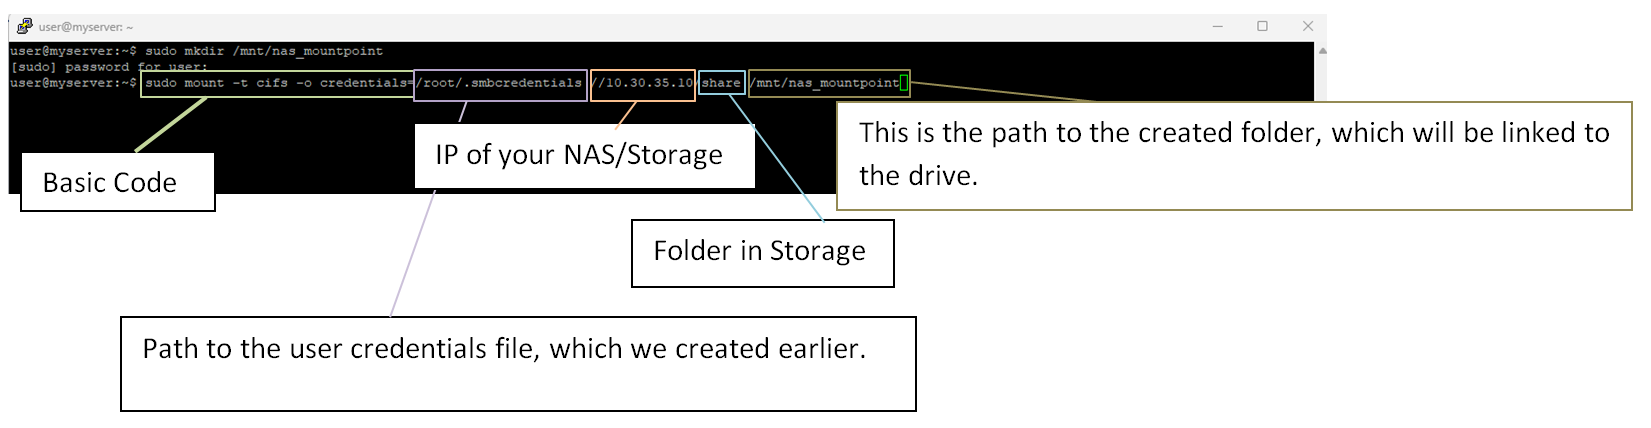
Now test the following commands where credentials=/root/.smbcredentials is included in the command. If you are unsure which SMB version your storage is using, try the command with Version 1 first.
If no error message appears, you will know that the command worked. Remember which command it was, because we will need to write it into the fstab file so that the drive is mounted automatically at every system startup.
Tip: Avoid using # in your password. Often, systems interpret # as a comment symbol, which can cause the password to be read incorrectly.
For SMB Version 1.0:
sudo mount -t cifs -o credentials=/root/.smbcredentials,vers=1.0 //10.30.35.10/share /mnt/nas_mountpointFor SMB Version 2.0:
sudo mount -t cifs -o credentials=/root/.smbcredentials,vers=2.0 //10.30.35.10/share /mnt/nas_mountpointFor SMB Version 3.0:
sudo mount -t cifs -o credentials=/root/.smbcredentials,vers=3.0 //10.30.35.10/share /mnt/nas_mountpointIf you were able to mount the drive, now open the fstab file and add the appropriate command. It is important that you know the SMB version because it must be specified in the command.
sudo nano /etc/fstab//YOUR NAS IP/folder /mnt/YourMountPoint cifs credentials=/root/.smbcredentials,vers=x.x,uid=1000,gid=1000 0 0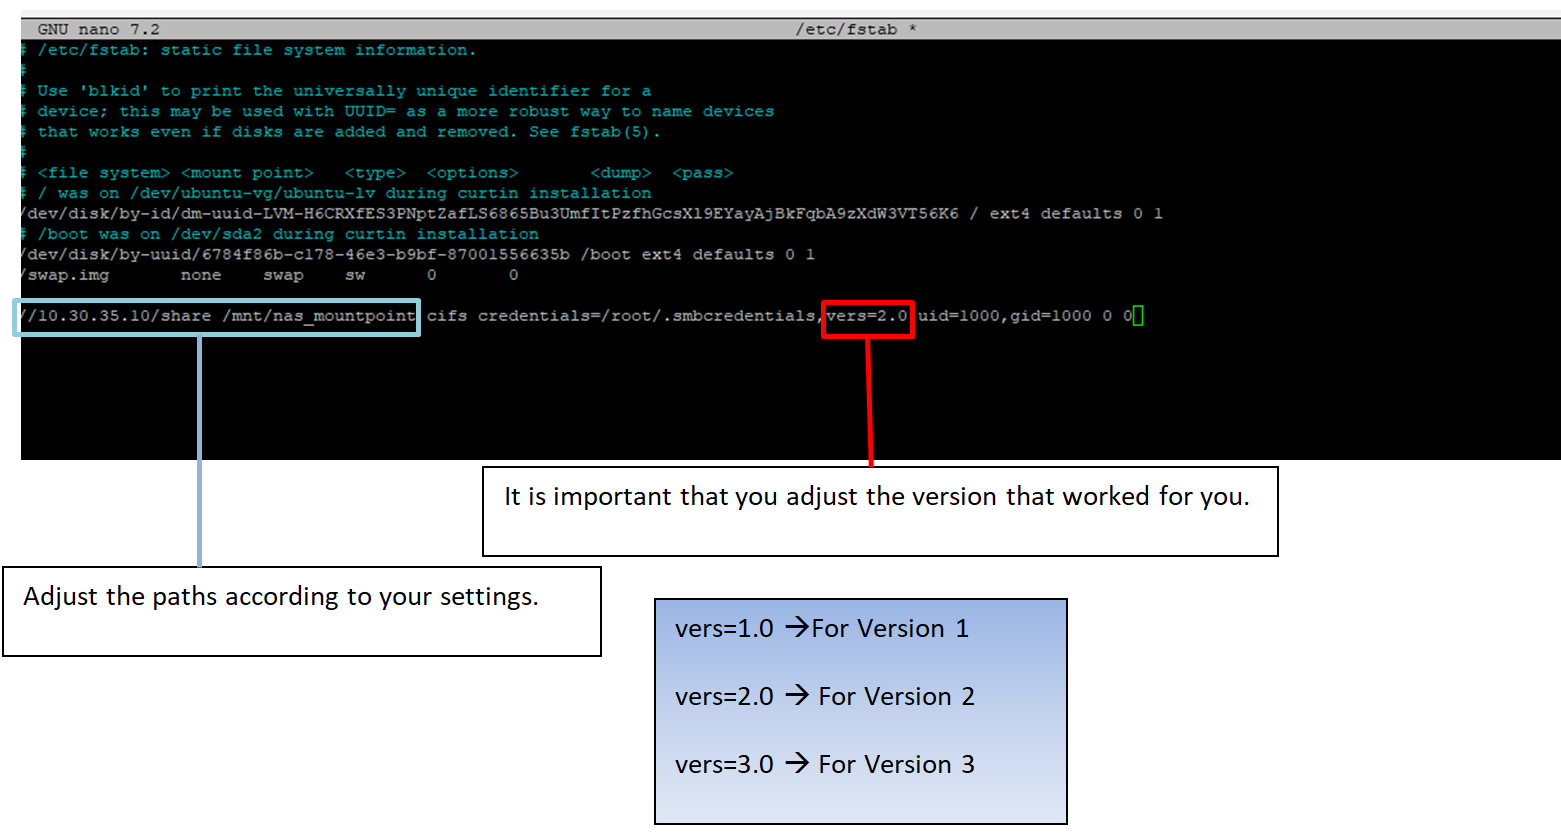
Save everything with CTRL + O and exit the editor.
Now the drive will be automatically mounted at every system startup.
If it didn’t work
It can happen that the user credentials read from the file are not properly passed to the NAS/storage for some reason. However, this is not a big issue as there is another way. The user credentials can simply be integrated directly into the mount command.
Here is the base command again:
sudo mount -t cifs -o username=mount,password=9AkEiFNhQHc8ETt //10.30.35.10/share /mnt/nas_mountpoint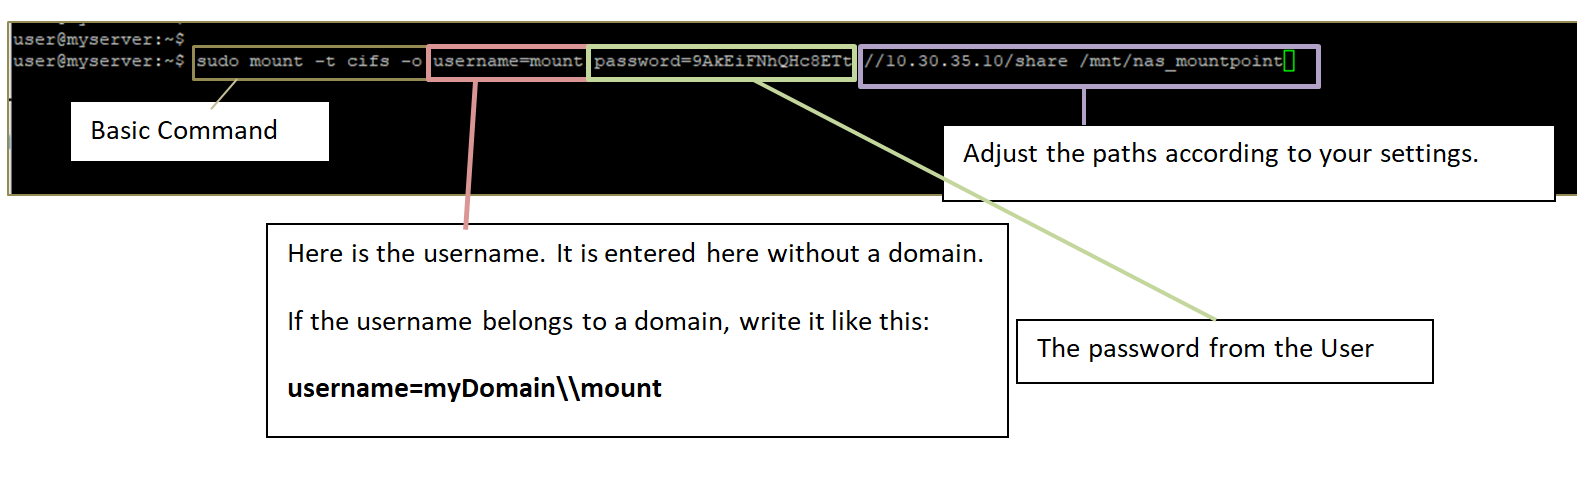
Now try all the versions again and remember the version that worked.
For SMB Version 1.0:
sudo mount -t cifs -o username=mount,password=9AkEiFNhQHc8ETt,vers=1.0 //10.30.35.10/share /mnt/nas_mountpointFor SMB Version 2.0:
sudo mount -t cifs -o username=mount,password=9AkEiFNhQHc8ETt,vers=2.0 //10.30.35.10/share /mnt/nas_mountpointFor SMB Version 3.0:
sudo mount -t cifs -o username=mount,password=9AkEiFNhQHc8ETt,vers=3.0 //10.30.35.10/share /mnt/nas_mountpointNow that it should have worked, add the appropriate command to the fstab file so that everything functions correctly at system startup.
However, adjust the command again to match your system: the IP address of the NAS/storage, the shared folder, the username and password, and the path to your folder where the drive will be mounted.
sudo nano /etc/fstab//YOUR-NAS/Storage-IP/sharefolder /mnt/YourCreated-folder cifs username=yourUser,password=YourPassword,vers=X.0 0 0For SMB Version 1.0:
//10.30.35.10/share /mnt/nas_mountpoint cifs username=mount,password=9AkEiFNhQHc8ETt,vers=1.0 0 0For SMB Version 2.0:
//10.30.35.10/share /mnt/nas_mountpoint cifs username=mount,password=9AkEiFNhQHc8ETt,vers=2.0 0 0For SMB Version 3.0:
//10.30.35.10/share /mnt/nas_mountpoint cifs username=mount,password=9AkEiFNhQHc8ETt,vers=3.0 0 0Save everything with CTRL + O and exit the editor.